An unexamined life is not worth living.

Showing posts with label Endgames - rooks. Show all posts

Saturday, June 6, 2015

The Importance of Keeping Rooks behind Pawns

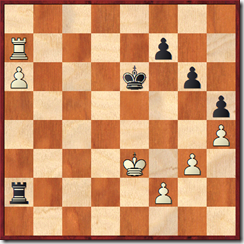
Haukenfrers - Jiganchine, 2004

image Black to move

The game ended with 1… b6?! 2. g4?? Rd4 –+

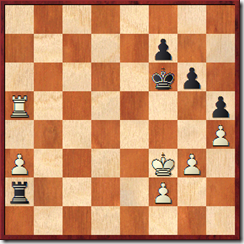
While researching for my recent book, I realized that White has good chances for a draw by playing 2.Kf2 followed by g3-g4, Rg1, etc. How could Black prevent this? I started thinking about whether starting with 1… Rd2 would be helpful, even though it seems like a potentially time wasting move. But after churning on this position overnight, FinalGen confirmed that this is the right approach – whatever it takes to not allow opponent’s rook to get behind the passed pawn!image  image

See my book for more examples of how computer-assisted analysis can confirm our ideas.

cover

Friday, February 20, 2015

Rook Endgames – Study Guide Ebook is Published

After 15 years of reviewing my analysis of many interesting rook endgames, it was a good time to summarize and make the findings public.
cover
This book expands on my article from "En Passant" magazine from many years back, and in it you will learn:
  • The real reason to analyze your games
  • What latest chess software can reveal about complicated endgames
  • How to properly assign roles to a king and a rook in endgames with passed pawns on both flanks
  • How to study any type of endgame that you are interested in
  • In which opening variation you can surprise the opponent with a prepared idea on move 33
“Rook Endgames – Study Guide” book is now available in the kindle store.

Sunday, June 22, 2014

FinalGen–Endgame Tablebases On Steroids

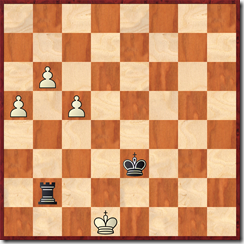
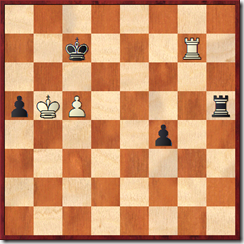
Several times I found myself looking for a solution to my problem online without finding it, only to later realize that the tool/utility/service has actually been around available for years. This happened with SCID, and now again with FinalGen. FinalGen is a free GUI utility that allows one to analyze endgames with 7 pieces and more after generating all the necessary data on demand! It is user friendly enough and does not require any complicated command line syntax or configuration, as one could expect. For the position below, it allowed me to generate exact evaluation in less than an hour! Apparently White wins!

Bernstein – Prince, 1946

image White to move – see the complete game here. image

I have played and analyzed quite a lot of rook endgames with two pawns vs one, and they often could not be precisely evaluated – until now!

You can get FinalGen on its website http://www.mtu-media.com/finalgen/home_ing.php

Friday, April 11, 2014

Chess Questions - Is there a freely available online 7 piece Endgame tablebase?

Scanning through chess.stackexchange.com website for recent chess-related questions, I came across the following post that I'd also like to pose to the readers of this blog:

Is there a freely available online 7 piece Endgame tablebase?:
The only 7 piece site I heard about is http://tb7.chessok.com/ , and upon registration I am able to setup various positions with 2-6 pieces . However as soon as I setup a position with 7 piece, I get an error about service not being avaiable. Has anyone had better luck or know of any other site with 7 pieces tablebases?

7 piece endgame tablebases solve the mystery of many theoretical endgames, for example Rook endgames with 2 pawns vs. 1, which can be quite tactical if the pawns are on different flanks.

Saturday, March 22, 2014

Theoretical Rook Endgame – Find the Only Winning Move

Jiganchine – Baunok, 2000, analysis
image White to move
For a solution – input this FEN string on this website: 8/8/8/6k1/3R4/PK6/8/r7 w - - 0 62
Hint: There is only one move that gives a win; White has to cut off the Black king along as many files as possible.

Wednesday, November 2, 2011

Tarrasch Rule in Rook endgames

The Tarrasch Rule says that that rooks should be placed behind passed pawns – either yours or your opponent's. It was in part this rule that I had in mind when I wrote my last blog entry. 

 [image%255B5%255D.png] I wrote about the diagram: “This type of positions is considered to be a theoretical draw because the Black rook is behind the ‘a’ pawn.” Well, I forgot about the entire chapter on this type of positions that I had read in Mark Dvoretsky’s “Endgame Manual” . Apparently in 2003 a few very important ideas were found for White, that give him many additional winning chances. Wikipedia describes the plan as follows:

Recent theoretical analysis of this position shows that White has a strong manoeuvre:

  1. advance the pawn to the sixth rank
  2. move the king towards the queenside
  3. when the black rook takes a kingside pawn, switch the rook to guarding the pawn from the c-file, i.e. Rc7 then advance the pawn to a7.
  4. Switch the white rook to the a-file with gain of tempo. Thus Black is forced to sacrifice his rook for the pawn without White having to move his king all the way to a7. These many extra tempos make the difference between winning and drawing or even losing.

The point of White’s play is that when the Black king advances – White threatens to give a check and block the ‘a’ file with the rook:
image  Black to move. White threatens with Rc5+, followed by Rc4-a4, or Rc6-a6, all with tempo.

In Bacrot – Robson, White had a good chance to play for a win in this position:
image White to move.

Bacrot played 60. Ra8?, but better was 60. Kd4!, giving up the pawn with the rook on a7 (where it attacks the pawn on f7).

The position in Wikipedia article is the exact one as in Bacrot – Robson, and it is given as winning! So Bacrot missed his win first, before Robson blundered in the clearly drawn position in the very end. It appears from the way Bacrot played this endgame, he had not known or remembered about this endgame research by Dvoretsky!

Sunday, October 30, 2011

Drama in the Rook endgame – Bacrot – Robson

Bacrot – Robson, World Cup 2011, Third Rapid game, replay the game here

image This type of positions is considered to be a theoretical draw because the Black rook is behind the ‘a’ pawn. Black conducted precise defence from this position, using the following plan:

  1. When the White king marches to the queenside to support the ‘a’ pawn, Black wins one of the kingside pawns (most likely – the f2 pawn)
     image Position after 68. Kc5 Rxf2
  2. Black then advances his pawns on the kingside, and creates his own passed pawn
    image After 77. Rb6 g5
  3. Black gives up the rook for the White ‘a’ pawn
    image image (Robson about to give up the rook for the pawn)
    Black plays 80… Rxa7, because White had already threatened with Ra6
  4. White is forced to sacrifice his own rook for the White pawn on the kingside, resulting in a draw
    image Black to Move
    This is where Ray Robson faltered, after playing this long and gruelling endgame, with 10 seconds of increment per move. Black cannot afford for his king to be pushed off to the ‘h’ file, so he must play 87… Kg2! 88. Rg6+ Kf1! with a draw. Instead he quickly played 87… h2?? and after 88. Rg6+ Kh3 89. Kf2!
    image Black to move, White is winning.
    it turned out that Black can’t promote the pawn into a queen because of Rh6+. Instead Robson promoted the pawn into the knight, and after 89… h1N+ 90. Kf3 Kh2 Rg6 Black resigned due to zugzwang. At the press conference after the game Robson pointed out exactly where he went wrong, so it would be wrong to accuse the GM of not being familiar with basic rook and pawn endings. But this shows how putting pressure and playing to the end pays off in these time controls with only 10 seconds per move. Mark Dvoretsky refers to such incidents as tragecomedies, but if you ever watched Bacrot and Robson battle it out, the word comedy would be far down on the list of terms to describe it!

image Game is over, Robson still seems in disbelief about what just happened.

Saturday, October 29, 2011

Kamsky’s Rook Endgame – Zugzwang

Gata Kamsky is famous for his excellent endgame technique, and he demonstrated it to win the first game of his match against the young Russian GM Ian Nepomniachtchi:

Kamsky – Nepomniachtchi, 2011 World Cup

image White to move
Black is down a pawn, but he appears to maintain some sort of equilibrium because he defends both kingside pawns with the king, and the rook attacks the pawn on g2, making it more difficult for White to advance the king. But it turns out that because the position of the Black rook is passive - White wins rather easily.

40. Kg3 Zugzwang! Either Black king or his rook have to move. Kg7 This abandons the e6 square, so White can attack e5 pawn from the 6th rank.
(Moving the rook does not help either 40... Ra1 (no longer attacking g2) 41. Kg4! a2 42. Kg5 Ke7 43. Ra7+ Ke6 44. Kxg6 Rg1 45. Rxa2 +-)
41. Re6! Re2 42. Rxe5 a2 43. Ra5

image
Up two pawns, White wins easily:
43… Kf6 44. f4 Rxe4 45. Rxa2 Kg7 46. Kg4 Rb4 47. Ra5 1-0
image Black Resigned

After some move by Black, White can play h5 (if gxh5, then Rxh5), and with two connected pawns, the win is trivial:
For example 47… Kf6  48. h5 gxh5+ 49. Rxh5

image This is a win according to tablebase: http://www.k4it.de/index.php?topic=egtb&lang=en

Replay the game here: http://www.chessgames.com/perl/chessgame?gid=1633762

Monday, October 18, 2010

Chess Endgames – Passed Pawns Must Be Pushed

Passed pawns in the endgame are more powerful than in the middlegame. With few pieces left on the board, they can be supported by their own king and tie up entire opponent’s army. As usual, it takes a bit of experience to sense that a pawn is especially dangerous in a given situation. Feel free to skip to the last diagram in this post to see the full power of passed pawns.

Jiganchine – Black, BC – Washington scholastic match, 1999

image Black to move.

My opponent did not find anything better than repeat the position after 41… Kf6 42. Rb6+ Kf5 43. Rb7 Kg6 44. Rb6+ Kg5 45. Rb7 Kf6 1/2-1/2
At the time I took it for granted that rook endgame with minimal material advantage ended as a draw. However, looking at this position with the fresh eye, draws attention to the fact that White’s king is very badly placed. It is completely cut off from the center of the board, so Black should take advantage of it: 41… d4!

image  On top of White’s king being badly placed, Black king protects the squares on the ‘d’ file from the White rook, so White has great difficulties stopping this pawn. I analyzed two options – both are losing for White.

a) 42. Rxg7 d3 43. Rg8 Kd5 44. Rd8+ Kc4 45. Rd7 Kc3 46. Rc7+ Kd4 47.Rxh7 d2 48. Rd7+ Ke3 49. h4 Ra4

image Black is winning: the White king is cut off along 4th rank,White has to sacrifice the rook for 'd' pawn

trying to stop the pawn immediately does not help either:
b) 42. Rb8 d3 43.Rd8 d2 44. h4 h5 

image White is in some kind of amazing zugzwang. Either his king has to leave the ‘g’ file, making e5-e4 break possible, or the rook has to go to d3, which turns out also problematic.
45. Kh2 e4! 46. fxe4 Ke5 47. Kg3 Kxe4 –+ Black king advances to support the pawn
45. Kf2? d1=Q+
45. Rd3 This is the only square for the rook on the ‘d’ file, but here comes: 45… e4!! 46. fxe4 Ra3!!

image Black wins as he is going to get a new queen. The triumph of the passed pawn!

Why did my opponent not consider this advance of the pawn, and why did I overlook it in whatever analysis I did after the game? The power of material must be so strong in player’s heads, that giving up even a pawn often does not occur to many players.

Saturday, October 16, 2010

Chess Endgames - Keeping the Rook Active

The major rule of rook endgames is that you should keep your rook active. When you look at a given position - usually it is obvious whether or not your rook is active However, sensing the moment and finding the tactical opportunity for activating the rook actually requires a bit of experience and judgement. An important corollary of the above rule is that you should also try to keep your opponent’s rook passive.

What does it mean for a rook to be active?
1) it attacks opponents’s pawns and protects its own
2) it can attack or cut off opponent’s king
3) it has freedom for manoeuvre, so zugzwang is never a problem
3) if there are vital open files or ranks  - it controls one of them

To be a bit more specific - here is an example from a report I wrote for a Canadian Chess magazine a few years ago:
Juma - Kazakevich, Canadian Junior Championship, 2004
image Black to move.

GAME CONTINUATION: In the game Black played 32….Kg7?  Centralizing the king cannot be wrong, it can only be untimely. White responded with 32. a4! and the game was agreed drawn a few moves later in this position:
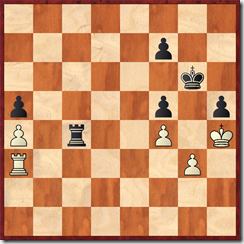
image Black can’t make any progress. His rook is slightly more active, but there is no zugzwang in sight. The extra doubled 'f' pawn has lost most of its value, and bringing the Black king to the queenside would cost the kingside pawns.

CORRECT CONTINUATION: Much better was 32... Rc3! 33. f4 Ra3
image 
The Black rook attacks both the a2 pawn and the g3 pawn. In the game it could only attack one of them at the same time. Such placement of a rook, which makes sure the 'a2' pawn does not move, is standard for rook endings (check out Rubinstein-Lasker, 1909, if you have not seen it). My analysis gave Black a win in all lines, but over the board it is enough to find the continuation that gives best winning chances, and that would be this line. Eventually we could come down to the position like this:

image White to move. He is in zugzwang, since his rook has no moves, so he is likely going to lose as Black king threatens to invade on g4.

Why bring up this old dusty game on which I already wrote something long time ago anyway? Well, it only today occurred to me that history repeated itself in my own game, and I also failed to keep my rook active in a pretty similar situation. This game was played even earlier, but I did not analyse it seriously until last year.

Nathani – Jiganchine, BC Junior Championship, 2001

image Black to move.
GAME CONTINUATION: I decided to play “safe”, keep as many pawns on the board as possible, and gave up the advantage by misplacing my rook:
27… Rb7? 28. Ra6 Rc7.
image Black’s rook is passive, an extra pawn does not mean much here, the game should be drawn.
CORRECT CONTINUATION
: Instead I had a much better option that would have kept my rook active:
27... Rb5! 28.Rxa7 Rxe5 29. Kg3 Rc5 30. Ra2 Ke7
image 
Black is up a pawn, and has a more active rook. Stronger players can correct me, but this is a lot likely to be winning than the position that I got in the game.

Thursday, January 7, 2010

Three rook endgames, three choices, three blunders, three videos

And incidentally, in all 3 games I played the Caro-Kann defence. Anyway, around the year 2000, I wrote an article about rook endgames, one of the examples was the Charbonneau game from below, and another was the famous Tarrasch – Rubinstein. Collecting and analysing a dozen instructive positions obviously did not prevent me from making mistakes in my own games, so here is further proof. Try to figure them out yourself first. They are not trivial, but given that you only have 2 reasonable choices, there is always a good chance of getting it right.


Game 1: Charbonneau – Jiganchine, CYCC 2000, Edmonton
image Black to move. Where to keep the rook? On h1 or f3?


Game 2: Krnan-Jiganchine, Canadian Championship 2004, Toronto
image Black to move.
Should the Black king support the ‘c’ pawn (e.g. Kc7), or instead rush to stop the ‘h’ pawn (e.g. Ke7) ?

Game 3: Kostin – Jiganchine, Keres Memorial 2006, Vancouver

image  White to move. Which pawn to push?
In the game White blundered, but I returned the favour and missed my chance for a draw, which was quite instructive.

We learn from our mistakes as more than from our wins, that’s maybe why I still remember these 3 games (ok, having them in a database helps too). Each one of these 3 positions required a bit of calculation, bit of planning/visualizing, and a bit of precise endgame theory knowledge. The second game (against Krnan) was particularly upsetting because after defending for a long time, I actually hoped to make a draw, whereas in the other two games I kind of expected that I might likely lose.

PS. I finally figured out how to make the volume louder in my videos - by using ffmpeg, not by yelling into my dysfunctional microphone. For me that’s probably the biggest win out of studying these 3 endgames.

Tuesday, December 29, 2009

Saturday, December 26, 2009

Passed pawns in the endgame – video

I blogged recently about this game where I played a grandmaster, now posted my comments as a youtube video as well:

Saturday, November 28, 2009

Kramnik – Grachev – rook endgame in a blitz game

I enjoyed watching the video while following the moves from the database in a separate window, you can do that too!

If you are curious how Grachev lost the endgame that was drawn all along, here is the culprit move/position:

image Black to move.
Grachev blundered with 51… Kc8? and later the pawn advanced with a decisive tempo.
As pointed out by computer - correct was 51... Kd8! 52. Kb6 Rh2 53. Rg8+ Ke7 54. c6 Rb2+ 55. Kxa5 Rc2 56. Kb6 f3 =
When you are playing against Kramnik – any position is full of tricks!

Thursday, November 19, 2009

Checkmate in the rook endgame

In the endgame a king is supposed to play an active role, so it is easy to miss cases where suddenly the king ends up in grave danger. In one of the variations of the Panov attack – an endgame arises where Black has to have a subtle feeling for whether his king should be active, or safe. I’ve already written a post called “Breakthrough in a rook endgame” where the Black king was playing an active role, so now – a couple of examples where the king comes under massive fire of White’s two rooks and potentially gets mated.

Charbonneau – Jiganchine, Edmonton, 2000, analysis

image Black to move r7/p5pp/1k3p2/3R4/7r/P4P2/1P3P1P/1KR5 b - - 0 29
Question:is it safe for Black to take on h2 with 29… Rxh2 ?
Answer: No! White plays a4 and Black has no good defence against Rb5+ and Rc6 #, say after 30. a4 Rxf2 31. Rb5+ Ka6 32. Rc6 #

image Game over

After 30. a4!, there is no other good defence, e.g. 30... a6 31. a5+ Kb7 32. Rd7+ Kb8 33. Re1 Kc8 34. Rxg7

image White is just winning r1k5/6Rp/p4p2/P7/8/5P2/1P3P1r/1K2R3 b - - 0 34
e.g. 34… Rd8 35. Rg8+ Kd7 36. Rxa8 +-

You’d say – who would fall for this type of trick? A grandmaster could, here is an example from the same Caro-Kann endgame:
Meier – Saltaev, 2006
(Click here to replay the entire game)

image Black to move 8/p2R4/8/3p1R1p/KP1k3r/P2r1P2/5P2/8 b - - 0 33
Black played 33… Kc4? (33… Kc3 was better) and resigned after 34. Rc7 Kd4 35. Rc5! 1-0

imageThere is no good defence against Rfxd5 with potential checkmate.
8/p7/8/2Rp1R1p/KP1k3r/P2r1P2/5P2/8 b - - 0 35

Sunday, November 8, 2009

Missed chance to beat a grandmaster

I faced a grandmaster in a 15 minute game on ICC yesterday, probably for the first time after playing there on and off for about 10 years. After making a blunder in the middlegame, I was forced to give up a piece for only a pawn. However, in the endgame, my opponent played a couple of inaccurate moves, and suddenly my pawns were rolling:

Mr-Pattaya – DDT3000

image  White to move. 1R6/1P4k1/8/5p2/1r4p1/3P3p/4KN2/8 w - - 0 50
Apparently Black’s pawns are too strong, and White’s are not going anywhere yet, so White decided to bail out and sacrifice both b7 pawn and the knight: 50. Rc8 Rxb7 51. Rc1 Kf6 52. Nxh3 gxh3 53. Kf3

image Black to move. 8/1r6/5k2/5p2/8/3P1K1p/8/2R5 b - - 0 53
The rook endgame is likely winning for Black, but we were down to about 1 minute SD, with 1 second increments, so as usual, a comedy of errors ensued. A few moves later, however, I got my chance for glory, after White played 66. d6??

image Black to move. 8/7r/3P1R2/8/8/4k2p/5p1K/8 b - - 0 66
66… Rh6!! would have won the game, as after 67. Rf8 Rxd6 I should be able to get to the Lucena position. Allowing me to queen the ‘f’ pawn after 67. Rxh6 f1Q should not save White either.
Instead I played 66… Ke2?? and White gave me a perpetual check with the rook, resulting in a DRAW. Perhaps – a fair result?

Saturday, October 17, 2009

Sharpen your Endgame Skills - Breakthrough in a Rook Endgame

Do you ever analyze your games with a computer and find really unusual hidden possibilities? It can be worth it sometimes!

image  Black to move

I came across this curious position while analysing one of my games from a recent tournament. Black has the initiative, but in most lines White is active enough to trade off all the pawns. The d2 pawn is a strength and a weakness at the same time. Computer found a brilliant concept:

53… g3!! You can check yourself that taking on f2, or f5 is not quite sufficient.
The idea is to win control over the e3 square, so after 54. fxg3 Re3 + Black wins the rook.

 image
The king has to stop attacking the d2 pawn, so after 55. Kc4 Re1Black wins the rook and is on time to collect White’s weak pawns. The d pawn proves to be a strength in this variation!

Click here to read more about rook endgames on my blog.

Hit Counter