An unexamined life is not worth living.

Showing posts with label endgame. Show all posts

Saturday, December 9, 2017

Bishops of Opposite Colour – Training Positions – Part 2

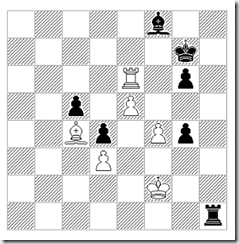
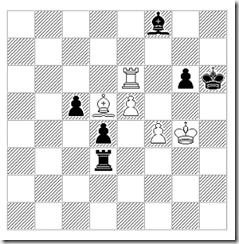
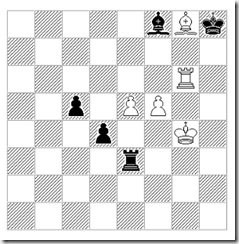
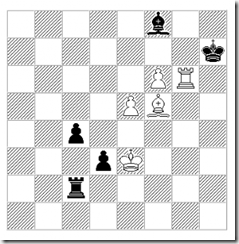
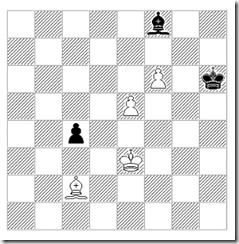
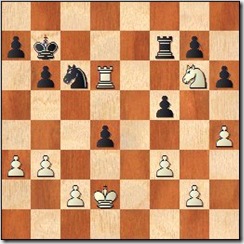
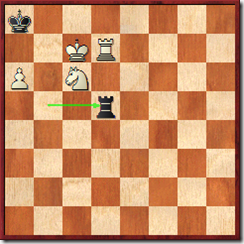
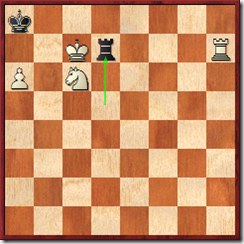
Bishop Endgames: Do Opposites Attract? (Practical Endgames) is now available as a paperback; here are some sample training exercises that illustrate the play in typical endgames with bishops of opposite colour. Scroll down to see the solutions.
image[3]


Csulits, Anton - Horvath, Miklos, 1989
205
White's turn

Hladik, Josef - Balaz, Peter, 1990.11.11
206
White's turn


Horvath, Gyula - Juhasz, Jozsef, 1990
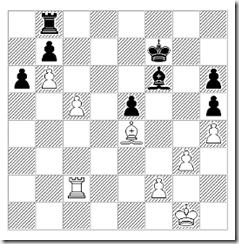
207
White's turn

Naumkin, Igor - Ward, Christopher, 1990
208
White's turn


Solutions:


Csulits, Anton - Horvath, Miklos, Szekszard op, 1989
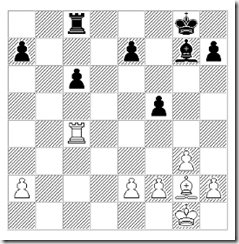
241
24. Bd5+
White noticed that winning the 'f5' is much more important than the 'c' pawn.

( The check is better than capturing on c6. 24. Bxc6 Kf8 )
24. ... Kh8 25. Be6 Rc7 26. Bxf5
242Black's pawns now are disconnected and White has an advantage which he converted into a full point.
26. ... c5 27. Kg2 Rc6 28. Be4 Rc7 29. Bd5 Bf6 30. f4 Kg7 31. Kf3 e5 32. e3 Kf8 33. Ke4 exf4 34. gxf4 Ke7 35. Kf5 Kd6 36. e4 Bd4 37. Ra4 1-0

Hladik, Josef - Balaz, Peter, CSR-chT 9091, 1990.11.11
243
39. Rxc6
White wins another couple of pawns, so the bishop endgame is winning.
39. ... Ke7 40. Rc7+ Rd7 41. Rxd7+ Kxd7 42. Bxd5 Kd6 43. Bg8 h6 44. Kg3 g5 45. f5
244
45. ... Be5+ 46. Kf3 Bf4 47. Ke4 Bc1 48. b3 Bb2 49. Kd3 Ba3 50. c4 Kc5 51. cxb5 Kxb5 52. Ke4 Kc6 53. Ke5 Kd7 54. Be6+ Ke7 55. f6+ Kf8 56. Kd5 Bb2 57. f7 Ba3 58. Kc4 Ke7 59. b4 1-0

Horvath, Gyula - Juhasz, Jozsef, Budapest Spring op 06th, 1990
245
40. Bxb7
( 40. Bxb7 Rxb7 41. c6 and the pawns supported by the rook win the game. )
1-0

Naumkin, Igor - Ward, Christopher, Lloyds Bank op 14th, 1990
246
30. Rd5
Forces Black's king to block the pawn.
30. ... Kd7 31. Rb5 Kc6 32. Rb6+
Another sacrifice - the rook again cannot be captured because of d6-d7-d8.
32. ... Kc5 33. d7 Bh5
247Black is setting up the last trap.
34. Bd6+!
Blocking the 'd' file with yet another check.

( 34. d8=Q?? would allow Black to bounce back 34. ... Rd1+ )
1-0


Saturday, August 15, 2015

Converting Extra Exchange - What is the Best Plan?

I played this game recently, and to my shame - lost the position with an extra exchange. What is the best plan to convert the material advantage? Is it possible to formulate it up front?

Jiganchine, Roman - Trotchanovich, Pavel, 2015.03.17 , C99

1. e4 e5 2. Nf3 Nc6 3. Bb5 a6 4. Ba4 Nf6 5. O-O Be7 6. Re1 b5 7. Bb3 O-O 8. h3 d6 9. c3 Na5 10. Bc2 c5 11. d4 Qc7 12. Nbd2 cxd4 13. cxd4 Nc4 14. Nxc4 bxc4 15. Bd2 Rb8 16. Bc3 Nd7 17. Qe2 Bf6 18. Rad1 g6 19. Qe3 Bg7 20. Qg5 Re8 21. h4 Rb5 22. Qg3 ( 22. Ba4 exd4 23. Bxb5 dxc3 ~ was rejected because of memories of our last game that went bad for me where Pavel sacked an exchange and won against me )  22. ... d5 23. Ba4 dxe4 24. Nxe5 Nxe5 25. dxe5 Bxe5 26. Bxe5 Qxe5 27. Qxe5 Rbxe5 28. Bxe8 Rxe8 29. Rd4 Bb7 30. Rxc4 Bd5 31. Ra4  ( 31. Rd4 Bxa2 32. Rdxe4 Be6 )  31. ... Re6 32. b3 Kg7

3
White has a pure extra exchange, but the black pawn on e4 somewhat prevents the white rooks from getting activated, and converting the advantage unexpectedly proved a challenge. Coordinating the two white rooks while insisting on exchanging one of them must be the key to winning this position.

0-1

Sunday, October 12, 2014

Playing for Queenside majority in the Endgame

Khairullin – Stander, 2003
image White to move
Solution in  "Endgames By Juniors" EbookVideo, or viewer below:

Sunday, June 22, 2014

FinalGen–Endgame Tablebases On Steroids

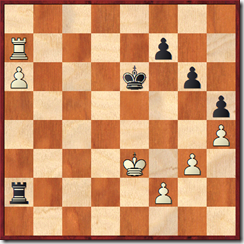
Several times I found myself looking for a solution to my problem online without finding it, only to later realize that the tool/utility/service has actually been around available for years. This happened with SCID, and now again with FinalGen. FinalGen is a free GUI utility that allows one to analyze endgames with 7 pieces and more after generating all the necessary data on demand! It is user friendly enough and does not require any complicated command line syntax or configuration, as one could expect. For the position below, it allowed me to generate exact evaluation in less than an hour! Apparently White wins!

Bernstein – Prince, 1946

image White to move – see the complete game here. image

I have played and analyzed quite a lot of rook endgames with two pawns vs one, and they often could not be precisely evaluated – until now!

You can get FinalGen on its website http://www.mtu-media.com/finalgen/home_ing.php

Saturday, March 22, 2014

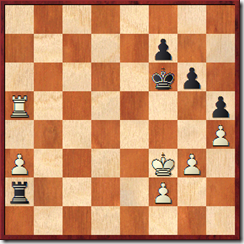
Theoretical Rook Endgame – Find the Only Winning Move

Jiganchine – Baunok, 2000, analysis
image White to move
For a solution – input this FEN string on this website: 8/8/8/6k1/3R4/PK6/8/r7 w - - 0 62
Hint: There is only one move that gives a win; White has to cut off the Black king along as many files as possible.

Sunday, June 9, 2013

Endgame Puzzle Solutions

Sargissian, Gabriel - Efimenko, Zahar
Bundesliga 0607  2007.02.03  

209[1] White to move
Solution: 36. Rc8 Rxc8 37. Bxe6+

This is decisive, because all of Black's pawns are also vulnerable.

37. ... Kf8 38. Bxc8 Ke7 39. Bb7 Ke6 40. Bc6 Bd2 41. Ba4 Bc3 42. Kf1 Bd2 43. Ke2 Bb4 44. Bc2 1-0


Kopylov, Mikhail - Kayser, Felix
Bayern-chI Bank Hofmann 10th  2006.11.12  

210[1] White to move
Solution: 39. Bxb5 d4

( 39. ... Rxb5 40. Ra7 +- )

40. Bc4 dxe3+ 41. Kxe3 Bb6+ 42. Ke4 Kf6 43. a4 Bg1 44. b5 Bxh2 45. Rxe6+ Kg7 46. b6 Bg1 47. a5 Rd7 48. Bd5 1-0


These positions are taken from my E-book about endgames with bishops of opposite colour:

image The book is formatted for electronic readers and can be read on devices of various sizes, from tablets to phones. The free sample includes 3 thoroughly annotated games and the full book comes with dozens of training positions to help develop a good sense for positions with bishops of opposite colour.

Wednesday, May 22, 2013

Carlsen outplays Karjakin in a tricky endgame

Carlsen, Magnus - Karjakin, Sergey Tata Steel Chess 2013

The game is taken from my E-book about endgames with bishops of opposite colour:

image The book is formatted for electronic readers and can be read on devices of various sizes, from tablets to phones. The free sample includes 3 thoroughly annotated games and the full book comes with dozens of training positions to help develop a good sense for positions with bishops of opposite colour.

This game has drawn a lot of attention due to the manner in which Carlsen outplayed his opponent.
1

53. f4  Carlsen wisely advances pawns on the dark squares to restrict Black's bishop - something we'll see very often in these endgames.

53. ... Bd6 54. Re8 Rb7 55. Ra8 Be7 56. Kg2 Rb1

2

57. e5 Re1 58. Kf2 Rb1 59. Re8 Bf8 60. Rc8 Be7

3

61. Ra8 Rb2+ 62. Kf3 Rb1 63. Bd5 Re1 64. Kf2 Rd1 65. Re8 Bf8 66. Bc4 Rb1

4 Question: How can White make progress?
Answer: by undermining Black's pawn chain and trying to advance f4-f5-f6, even if that involves some sacrifices.

67. g4

After some manoeuvring, Carlsen begins a major pawn breakthrough that aims against Black bishop and king that have been boxed on the kingside. Due to his active rook Black had his chances, but they were extremely difficult to exploit in the time trouble that Karjakin was in.

67. ... hxg4 68. h5 Rh1

( 68. ... gxh5! 69. f5 h4 70. f6+ Kg6 71. Rxf8
5 71. ... Kf5 White won the bishop, but Black gets enough counterplay due to his active pawns, king and rook. 72. Rh8 Rb2+ 73. Kg1 Rb1+ with a perpetual check. )

69. hxg6 fxg6 70. Re6

6 Temporarily Black has an extra pawn, but his pawns are now vulnerable, and Black's bishop still has no moves.

70. ... Kh6 71. Bd5 Rh2+ 72. Kg3 Rh3+ 73. Kxg4 Rxd3

7

74. f5

( 74. Be4!? was also possible. )

74. ... Re3 75. Rxg6+ Kh7 76. Bg8+ Kh8

8

77. Kf4

White's pawns are further advanced and better supported by his pieces.

77. ... Rc3 78. f6 d3 79. Ke3 c4 80. Be6 Kh7 81. Bf5 Rc2

9 The black king is still a vulnerable piece that Carlsen keeps exploiting. Now he utilizes the discovered check to transpose into a winning bishop endgame. His two connected passed pawns will be enough for a win because they are still placed on dark squares and cannot be blocked by the black bishop.

82. Rg2+ Kh6 83. Rxc2 dxc2 84. Bxc2

10

84. ... Kg5 85. Kd4 Ba3 86. Kxc4 Bb2 87. Kd5 Kf4 88. f7 Ba3 89. e6 Kg5 90. Kc6 Kf6 91. Kd7 Kg7

11

92. e7  Black resigned, as White inevitably promotes a pawn.  1-0

Tuesday, January 29, 2013

Chess Strategy - Exchanging pieces to a favourable Bishop Vs. Knight endgame - Video

When playing against young players, the most reliable strategy in chess often is to trade off into an endgame. In this game White placed his pawns on dark squares, despite having traded off the light squared bishop. Those pawns became an easy target for my king and bishop once the heavy pieces came off the board.

Monday, January 14, 2013

Chess Strategy: Exchange Sacrifice in the endgame, power of two bishops

Here is an older video of the game I played 10 years ago, where the power of two bishops in the endgame is full revealed. A blog entry with the game analysis: http://roman-chess.blogspot.com/2009/06/paul-keres-memorial-2002-part-2-two.html

Saturday, October 6, 2012

Changes to Chess Publishing in the Past 10 years

10 years ago I was actively involved in writing chess articles for Canadian chess magazine (it was called “En Passant” at the time). As I was going through my old articles I started thinking of what changed in the world of chess publishing in the past 10 years:

  • Computer engines have become much stronger, so most analysis absolutely must be checked with them
  • six piece endgame table bases have been developed, which does have an impact on a lot of my articles – since I focused on endgames
  • Paper books is not the only format in which chess materials are distributed. Many chess materials are published as free and commercial videos and on web sites. Ebooks have really taken off with most chess books published today also being available in digital format. 
  • The way I am creating this blog post is actually by talking into a microphone and then the computer converts my speech into text, even though it does require a lot of correction
  • The magazine for which I wrote is no longer sent out by mail to all members of Canadian chess federation and instead is also available online

10 years ago the amount of information available seemed overwhelming, and this is even more true today. Good information and study materials are still in high demand - quality was important 10 years ago and it is still very important now. Reviewing the analysis and commentary that I created 10 years ago it is easy to spot some mistakes, but we do live in a different world today…

Microphone gooseneck

Saturday, April 7, 2012

Introduction to Rook and Knight Endgames – General Principles

This blog post is taken from my old article and is intended as continuation of my articles about endings with each side having a rook and a bishop of opposite color, and the article about rook endings with 2 pawns vs. 1. The idea behind these series is the approach that Nimzowitsch used to call "a radioactive method" - selecting a rather narrow topic, and by learning a lot about it, understand chess much better in general. This time I would like to look at endings with rook + knight Vs. rook + knight. This material balance is also a quite frequent guest in tournaments, and some classical ideas and endgames have become well-known. Nonetheless, there is some lack of discussion of this topic in chess literature. Mikhail Botvinnik was well known for his great technique in this type of endings, and I would strongly recommend to the reader to study two famous endgames Botvinnik-Alekhine 1938, and Botvinnik-Levenfish, 1937. Instead of these, I included several less known examples from his career.

Morozevich Alexander (2625) - Volkov Sergey (2605)
Samara 73/309, 1998
knight_rook_3[4]

32...Rc8 Let's look at a typical game with this material balance. In this position Black is suffering from a bad pawn structure and passive pieces. 33.Re6 Obviously White does not want to trade off his rook - the best piece to collect Black's pawns. [33.Rxc8 ? 33...Kxc8 gives Black a decent position] 33...Rc7 34.a3 !? a useful waiting move; now White can move the N from d3 and attack Pd4 with the King. 34...Ne7 [34...Re7 Black cannot insist trading rooks, as now it would cost him a pawn! 35.Rxe7+ Nxe7 36.Nf4 Nc6 37.Ne6 g6 38.Kd3] 35.Rd6 Nc6 Again, Black has to come back; White's active rook paralyzes his pieces. 36.Nf4 Rf7 37.Ng6

knight_rook_4

Threatening Rxc6 37...Rc7 38.h5 Pg7 and Pf5 are cut off from each other and White can threaten to pick them up at any point 38...a5 39.Rd5 Rf7 40.Nh4 f4 41.Rf5

image

Now! White got the pawn structure he wanted (b4 covered, g7 fixed) and himself offers the exchange of rooks. The knight endgame is a nightmare for Black, so keeping the rook is his only chance for any counter play. 41...Rd7 42.Rxf4 d3 Desperate sacrifice. White won in a few moves. 43.cxd3 Nd4 44.b4 a4 45.Ng6 Rd5 46.Rf7+ Ka6 47.Nf4 Rd6 48.Rxg7 Rc6 49.Nd5 Rc2+ 50.Kd1

image   1-0 This victory was part of Morozevich's amazing rise to the chess stars during 1998.

The game illustrates typical themes for chess endgames with Rook + Knight:

  • Pawn Structure - weak pawns are vulnerable
  • Active Rook
  • Timely Transition into Knight Endgame

Thursday, February 9, 2012

Karpov - Kavalek - the power of Maroczy bind

This instructive video shows Anatoly Karpov's ability to exploit small advantages, especially in endgames. It has now become the classic game for understanding White's strategy in this opening variation.

Tuesday, December 27, 2011

King Race in Pawn Endgame

This endgame occurred in my game almost 15 years ago.

Jiganchine – Verkhovskaya, Alushta 1997

image Black to move.

There are two legitimate questions associated with this position:

  1. What move should Black play?
  2. With best play from both sides, how should the game end?

Hint: Black stands no chance in the king race, so he must play correctly with his pawns!

Friday, November 18, 2011

Crazy Rook Stalemate At the World Cup

One of the most dramatic moments of this year’s World Cup happened early on, in the first rapid playoff game in Felgaer – Malakhov match. The Russian grandmaster is known as an endgame expert, but and here he found a miraculous defensive resource in what kept looking like a hopeless endgame.

image Black to move. His position looks completely hopeless, but since the king is stalemated, he can try to play for a draw with 116. ... Rb5+!? Of course White does not accept the sacrifice, which would have lead to immediate draw.
117. Kc7 Rd5!
image  White to move
118. Rh7 ?? One move before victory, Felgaer crumbles under immense pressure. The rook is unprotected on ‘h7’ and this makes all the difference. Correct was 118. Re7! Rd7+ 119. Kb6!, and White wins.
118... Rd7+ !
image White is forced to take the rook, since otherwise his own rook on h7 falls. But now this is stalemate.
119. Kxd7 1/2-1/2

image Malakhov just played Re7+, and you can see that GM Alekseev is the first one of the spectators to react with a grin, all others are still trying to figure out what’s going on for another couple of seconds.
image

A few seconds later – Felgaer can’t believe that 120 moves into this game, victory just escaped!image 
The shock of this draw had an interesting effect on the two players, as in the second game Malakhov lost quickly as White and was eliminated.

Wednesday, November 2, 2011

Tarrasch Rule in Rook endgames

The Tarrasch Rule says that that rooks should be placed behind passed pawns – either yours or your opponent's. It was in part this rule that I had in mind when I wrote my last blog entry. 

 [image%255B5%255D.png] I wrote about the diagram: “This type of positions is considered to be a theoretical draw because the Black rook is behind the ‘a’ pawn.” Well, I forgot about the entire chapter on this type of positions that I had read in Mark Dvoretsky’s “Endgame Manual” . Apparently in 2003 a few very important ideas were found for White, that give him many additional winning chances. Wikipedia describes the plan as follows:

Recent theoretical analysis of this position shows that White has a strong manoeuvre:

  1. advance the pawn to the sixth rank
  2. move the king towards the queenside
  3. when the black rook takes a kingside pawn, switch the rook to guarding the pawn from the c-file, i.e. Rc7 then advance the pawn to a7.
  4. Switch the white rook to the a-file with gain of tempo. Thus Black is forced to sacrifice his rook for the pawn without White having to move his king all the way to a7. These many extra tempos make the difference between winning and drawing or even losing.

The point of White’s play is that when the Black king advances – White threatens to give a check and block the ‘a’ file with the rook:
image  Black to move. White threatens with Rc5+, followed by Rc4-a4, or Rc6-a6, all with tempo.

In Bacrot – Robson, White had a good chance to play for a win in this position:
image White to move.

Bacrot played 60. Ra8?, but better was 60. Kd4!, giving up the pawn with the rook on a7 (where it attacks the pawn on f7).

The position in Wikipedia article is the exact one as in Bacrot – Robson, and it is given as winning! So Bacrot missed his win first, before Robson blundered in the clearly drawn position in the very end. It appears from the way Bacrot played this endgame, he had not known or remembered about this endgame research by Dvoretsky!

Sunday, October 30, 2011

Drama in the Rook endgame – Bacrot – Robson

Bacrot – Robson, World Cup 2011, Third Rapid game, replay the game here

image This type of positions is considered to be a theoretical draw because the Black rook is behind the ‘a’ pawn. Black conducted precise defence from this position, using the following plan:

  1. When the White king marches to the queenside to support the ‘a’ pawn, Black wins one of the kingside pawns (most likely – the f2 pawn)
     image Position after 68. Kc5 Rxf2
  2. Black then advances his pawns on the kingside, and creates his own passed pawn
    image After 77. Rb6 g5
  3. Black gives up the rook for the White ‘a’ pawn
    image image (Robson about to give up the rook for the pawn)
    Black plays 80… Rxa7, because White had already threatened with Ra6
  4. White is forced to sacrifice his own rook for the White pawn on the kingside, resulting in a draw
    image Black to Move
    This is where Ray Robson faltered, after playing this long and gruelling endgame, with 10 seconds of increment per move. Black cannot afford for his king to be pushed off to the ‘h’ file, so he must play 87… Kg2! 88. Rg6+ Kf1! with a draw. Instead he quickly played 87… h2?? and after 88. Rg6+ Kh3 89. Kf2!
    image Black to move, White is winning.
    it turned out that Black can’t promote the pawn into a queen because of Rh6+. Instead Robson promoted the pawn into the knight, and after 89… h1N+ 90. Kf3 Kh2 Rg6 Black resigned due to zugzwang. At the press conference after the game Robson pointed out exactly where he went wrong, so it would be wrong to accuse the GM of not being familiar with basic rook and pawn endings. But this shows how putting pressure and playing to the end pays off in these time controls with only 10 seconds per move. Mark Dvoretsky refers to such incidents as tragecomedies, but if you ever watched Bacrot and Robson battle it out, the word comedy would be far down on the list of terms to describe it!

image Game is over, Robson still seems in disbelief about what just happened.

Hit Counter