An unexamined life is not worth living.

Showing posts with label strategy. Show all posts

Sunday, March 4, 2012

Questions of Modern Chess Theory - Book Review

I heard about the book Questions of Modern Chess Theory a long time ago – back in the nineties, when I was still studying chess in Russia. Reading it today, I realize that this classic work, although it is very old – still reflects well on modern approach to chess strategy and opening theory. It covers the connection between calculation and assessment, explains how to strike balance between following rules and looking into the specifics of the positions, and gives examples of opening variations that to me – appear still relevant today – Botvinnik variation of the Slav, IQP positions and so on.
The chapter on modern approach to gambit play is also quite instructive. It echoes what books by John Watson and Kasparov talk about, except for it was written half a century before them, and should be given proper credit. No wonder that the young Bobby Fischer had lots to learn from this book by Lipnitsky!
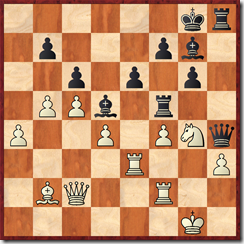
image
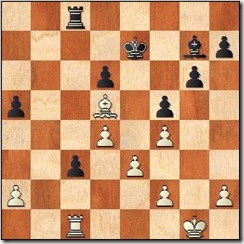
As a quick example, I was particularly impressed by Lipnitsky’s explanation of this famous game, that appeared from a common IQP structure:
Botvinnik – Alekhine, 1938
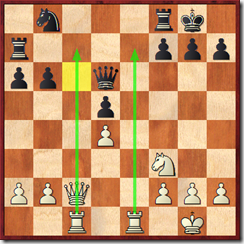
 image Black to  move. His position is strategically very difficult. He ended up losing the game.
I remembered that Black lost because he had troubles preventing White’s invasion on two open files, and that c6 square being weakened was part of the problem. But Lipnitsky explains this connection very clearly: with the pawn back on b7, Black would have been able to play Nb8-c6 and contain most of White’s initiative. As it is, White threatens to invade both to c7 and to e7, and that is too much for him to handle. From my experience, such strategic insights into details of each position are precious, especially if they shed a new light on a well known game.
Recommended: 9/10.

Sunday, October 10, 2010

Pawn Structure in the Closed Spanish – Geller vs. Smyslov

Following up on my previous post, here is another example from the collection of Efim Geller games “Application of Chess Theory

Geller – Smyslov, 1970
image position after 22.Nf3

The 7th world Champion Vassily Smyslov “agreed” on this pawn structure (by playing f7-f5), despite its several long term flaws:
1) light squares are weak, and in particular - White’s knights can occupy e4 and f5 squares
2) d6 pawn is weak
3) White controls the ‘a’ file
5) the b4 and d5 pawns restrict Black’s knights, and especially - the d8 knight has no good future prospects

However, commenting on static features of a position is much easier than exploiting them to your advantage against a strong opponent. Watch this video to see how Geller converted his positional trumps into a full point:

While Geller’s game serves as an argument against playing an early f7-f5 in Closed Spanish, delaying it may lead to White himself playing f2-f4-f5. The final position of Karpov – Unzicker, 1974, illustrates that idea:
image White just played Ng3-h5 and Black resigned!

A game Nunn-Short, 1986 illustrates how Black can try to implement f7-f5, without giving up the e4 squares:

image Black just played f7-f5, but White’s pieces are well prepared for complications;
watch the video to see who comes out on top:

Tuesday, August 24, 2010

Opposite Coloured Bishops – part 14

I found this example in one of the books by Mark Dvoretsky, in the chapter written by Gregory Kaidanov. The game shows the power of making far reaching long term strategic plans, in positions where your opponent is completely tied up. In endgames with opposite coloured bishops, fortresses are very common; to break through such defensive schemes you have to think in terms of plans, rather than follow “move-by-move, let’s see what happens next” style.
Psakhis Lev (ISR) (2580) - Hebden Mark (ENG) (2435)
Ch World (team) (under 26) Chicago (USA), 1983

opposite_bishop_139 White to move – find the winning plan.
Black pieces are completely tied up to the defence of 'f7'. And yet it takes a very original plan from Lev Psakhis to win this game.
43.Kf1 Ba7 44.Ke2 Bb6 45.Kd3 Ba7 46.Kc4 Qc7+ 47.Kb3 Qe7 48.g4 Bb6 49.Kc4 Ba7 50.Kb5 Diagram

opposite_bishop_140

What is the king doing? 50...Qe8+ 51.Bc6 Qd8 52.Kc4 Qe7 53.Qd7! This is the point! After the exchange of queens the White king will support the advance of the 'b' pawn. 53...Qe6+ 54.Qxe6 fxe6 55.Rxf8 Kxf8 56.Kb5 Diagram

opposite_bishop_141

56...Ke7 57.Ka6 Bxf2 58.c4 Kd8 59.Kb7 Be1 60.b5 Bf2 61.b6 Bd4 62.Ba4 d5 63.cxd5 exd5 64.exd5 e4 65.Kc6 Kc8 66.d6 e3 67.Bb5 Bf6 68.Ba6+ Kb8 69.Kd7 1-0

Saturday, November 28, 2009

Opposite Coloured Bishops – part 11

I am continuing the series of annotated games with endgames with bishops of opposite colours. More examples are here. This example illustrates that weak pawns are vulnerable in this type of endgame just like in any other. A rook is particularly good at picking up weak pawns, while the bishop can help to protect your own pawns.
Chiburdanidze Maia (GM) (GEO) (2500) - Hoffmann Michael (GER) (2485)
It Lippstadt (Germany) (1), 1995

opposite_bishop_125

31.Kg2 White has an advantage, as the Black bishop is in a cage of white and black pawns. As Black tries to free up the bishop with 'g6-g5', his pawns are going to become weak. [31.Kf1 !? planning Kf1-e2-d3, then if 31...Bf6 32.Ke2 Bh4] 31...Bf6 32.Kg3 h6 ? ! [32...a4 !? A much better way to activate the bishop was: 33.Rc2 ! ? (33.a3 ? 33...c2 -0.48) 33...a3 34.Kf3 Kd7 35.Ke2 Bd8 36.Kd3 Ba5 37.f3 Rb8 38.Bb3 0.00] 33.Bb3 g5 34.Bc2 Ke6 35.Rb1 Diagram

opposite_bishop_126

35...gxf4+ ? [35...Bd8 36.Rb7 Bc7 +0.48] 36.Kxf4 Notice how many 'pawn islands' Black has. 36...Bg5+ 37.Kf3 Bd8 38.Rb5 d5 39.Ke2 Rc4 40.Kd3 a4 41.Rb8 Be7 42.Rh8 Diagram

opposite_bishop_127

All 5 Black's weak pawns start to fall down like leaves from a tree in fall. 42...f4 43.Rxh6+ Bf6 44.Rh7 a3 45.Bb3 c2 46.Bxc2 Rb4 47.Bb3 f3 48.Ra7 Diagram

opposite_bishop_128

1-0

Tuesday, November 3, 2009

Fortress in a pawn endgame

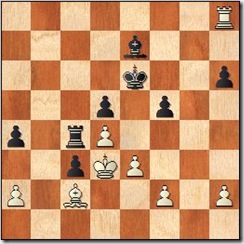
This position could have appeared in one of my old games, had I played 33. Bf2-e1!?

image Black to move. Can he win by going into pawn endgame with 33…Nxc3?

I would be forced to take on c3, and we’d need to see if White has a good response here after 34. Bxc3 bxc3
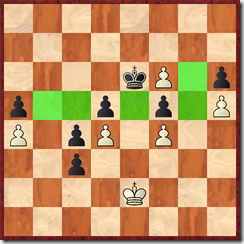
image White to move. How to create a fortress?

I blogged about another pawn endgame a couple of days ago, it was all pawn races and calculation. Here instead we need to think strategically – what plans does Black have, and how can we prevent them? Looking for the answer, you will see that Black’s protected passed pawn on c4 is going to keep White king tied up. Black king may then break through either on the kingside or on the queenside. We can keep queenside closed by playing a2-a4, but what about kingside?

35 . h6!! is the only way to create a fortress. 35… gxh6 (otherwise White would play 36. h7!) 36. h4 Kd7 37. a4 f6 38. exf6 Ke6 39. h5

image Black cannot break through. Draw! Notice that if Black did not have his own a5 pawn, he would be winning – this actually happened a bit later in that same game.

Instead of allowing such a fortress, Black should play 33… b3! 34.axb3 cxb3 35. Kd1 Na3 36.Kc1 Nc4 –+

image Full domination of knight over bishop.

Friday, October 9, 2009

How to Win a Chess Game by Activating the rooks – Creative Chess from Michael Adams

I came across this pretty interesting game, Bergsson – Adams, 2003. In the position on the diagram - Black has full compensation for the pawn, but how does he improve his pieces? Michael Adams saw a weakness in the h3 pawn, and decided to … attack it with rooks. Moral of the story – if you have a dominating position and are rated 700 points higher than your opponent, you can try all kinds of creative ideas!

image Black to move

30… Kh7 31. Nc4 Rh8 32. Ne5 Bf5 33. Re2 Kg8

image Nice – now the h3 pawn is under attack!

34. Rh2 Qe7 35. Rdd2 g6 36. b4 Rh5 37. Rdg2 But wait, he liked the idea, so he does it again, now bringing the d8 rook to the h file!

image Black to Move.

37… Kh7!! 38. Qe3 Rh8 39. Ng4 Bg7 40. a4 Ra8 41. Qb3
Be4 42. Re2 Bd5 43. Qc2 Qh4 44. Re3 Rf5 45. Rf2 Rh8 46. b5 Kg8
The king triangulated again, now both rooks are attacking the weak white pawns!

image 47. b6 Qxg4+ White collapses under the pressure 48.Kf1 Rxh3 49. Rxh3 Qxh3+ 50. Ke2 Qg4+ 51. Ke1 Rxf4 52. Rxf4 Qxf4 53. a5 Bxd4 54. a6 Qg3+ 55. Kd1 Qg1+ 56. Ke2 Qf2+ 57. Kd1 Bf3+ 58. Kc1 Qe1+ 0-1

Replay the game in the viewer:

Saturday, March 7, 2009

Complexity vs. simplicity – a story about Lilienthal and Flohr

A director of a chess club in Moscow (who was also sometimes coaching me how to drop pieces less frequently) once told me a story about how chess players with different styles approach the same position. Back in the seventies – there were no computers, so to analyse a position one would have to spend hours looking for possible ideas, plans, and there tactical implications. A friendly grandmaster’s help would always be appreciated.

Salo Flohr and Andre Lilienthal both had interesting biographies, and at some point in the lives they were both Soviet citizens, and lived in Moscow. During that time my coach, who was on friendly terms with both with them, would sometimes ask them both to analyze the same position. A day later each would come back with the same assessment: the position is winning for White. Lilienthal would bring several pieces of paper with written variations proving his conclusion. Flohr would instead say a couple of sentences along the lines of “White wins by transferring the rook to the seventh rank via the c file. If Black attempts to cover all invasion squares, White breaks through on the kingside where his pawns are further advanced”.

That was matching their playing styles – Lilienthal was the one who defeated Capablanca with a queen sacrifices, and Botvinnik used to say that all Soviet masters should study Flohr`s games to improve their positional understanding. Variations are crucial for proving your point, but summarizing a position`s essence with a clear verbal assessment is also extremely valuable.

image image

Sunday, February 15, 2009

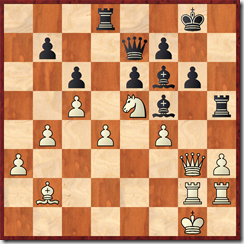
Strategic mistake, Koons-Jiganchine, 2006


By playing 10..Bf2? I made a strategic mistake and decided to win material instead of finishing my development. I rather naively missed the fact that my remaining pieces would be hard to develop, and White king will be in no danger at all. It was much better to simply exchange the queens.

11. Kxf2 Qh4+ 12. g3 Qxc4 13. Qd6


compensation for the pawn is terrific. I was later extremely lucky to save the game.

Sunday, January 4, 2009

Attacking Chess - seeing the entire board

Jiganchine - Trotchanovich, Fraser Valley Championship, 2008.

image

White to move.

How can White bring his bishop and knight effectively into the game?

Again, a video is worth a thousand pictures:

See my youtube account for a couple more chess videos.

Tuesday, August 19, 2008

Sokourinski - Niksic, BC Closed 2001

Replay Game Sergei Sokourinski - John Niksic, BC Closed 2001

Sergei Sokourinski - John Niksic [E16]

BC Closed/Vancouver (1.4) 2001


1. d4 Nf6 2. c4 e6 3. Nf3 Bb4+ 4. Bd2 a5 5. g3 b6 6. Bg2 Bb7 7. O-O Bxd2 8. Nbxd2 Capturing with the queen, followed by Nc3 is a bit more popular 8... d6 9. Qc2 Nbd7 10. a3 a4?! With the knight on c3 this would be impossible, but here Black decided he can afford pushing the pawn to a4 to prevent b4. 11. Nb1!? Ra5 12. Nc3 Qa8 13. Nb5 Qb8 14. Rac1 O-O 15. Rfe1 Re8 16. e3 h6 17. h3 Ne4 17... Be4!? 18. Nd2


18... Nxd2 19. Bxb7! This move seems to be losing an exchange, but... 19... Nb3 20. Bc6 Nxc1 21. Bxd7 Re7 22. Bc6 Nb3 23. Nc3 Qa7


24. Nxa4 This is the point of White's exchange sacrifice: the 'a4' pawn falls, the knight on b3 is gone and what Black is left with is a small material advantage, disorganized pieces and the White 'a' pawn being a potential passer. The bishop on c6 is soon going to become a monster! 24... Rxa4 25. Qxb3 Ra5 26. Qc3 Rg5 27. h4 Rg6 28. b4 e5


29. d5! Of course, White wants to keep the position closed. The fact that the bishop then becomes blocked is not important as from c6 the bishop is still limiting the Black rook on e7 and is playing an important role in the advance of the 'a' pawn 29... f5 30. a4 Rf6 31. a5 g5 32. hxg5 hxg5 33. a6! Now the game is strategically won for White as the Black queen always has to guard the a6 pawn. 33... Rh6 33... Qxa6? loses a queen to 34. Ra1 34. b5 Reh7 35. Kf1 Kf7 36. Ke2 Rh8 37. Bd7 Rf6 38. Qd3 e4 39. Qd4


39... g4 With seconds left on his clock Black lets his position collapse However, after 39... Rh2 White is still winning. 40. Bxf5! Compare the queen on a7 to the queen on a5 in Jiganchine- Niksic. By coincidence, in both games White wins by delivering a tactical blow on f5 40... Rh2 41. Qxe4 Qa8 42. Be6+ Kf8 43. Rf1 Kg7 44. Qxg4+ Kh6 45. Bc8 Rf8 46. Qe6+ Kg7 47. Qe7+ Rf7 48. Qg5+ Kh8 49. Be6 Rf8 50. e4 Qe8 51. Ke3 c6 52. bxc6 Qb8 53. Qe7 b5 54. Qxf8+ Qxf8 55. c7 Qf6 56. c8=Q+ Kh7 57. Bf5+ Kh6 58. Qe6 1-0 [Roman Jiganchine]

Hit Counter