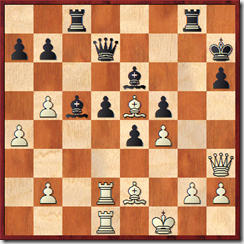
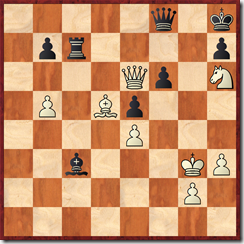
 White to move
Solution in "Endgames By Juniors" Ebook, Video, or viewer below:
An unexamined life is not worth living.
 White to move
Vassily Ivanchuk is one of the greatest players of our time, and in this position he found a way to increase his advantage against another great player.
Ivanchuk – Kortchnoi, 1994
See the entire game for the solution.
Hint: remember Bronstein’s explanation: the weakness of the dark squares is also the weakness of light squares because opponent’s pieces can occupy key dark squares and attack your pieces that are placed on light squares! This rule applies perfectly in this position.
Solving this chess puzzle from Susan Polgar’s blog, I had a bit of a dilemma, choosing between transforming the position into one of two possible endgames.
Kulon – Juracz, 2011
Everyone answering the question (other than me) – decided on the exchange sacrifice 1… Rxa2 2. Rxa2 Bb2.
OPTION 1 – “Pawn endgame”
Why not just trade rooks with 1… Rxe2 2. Kxe2 f5 and go for endgame with bishops of opposite colour – which I am a big fan of:
OPTION 2 – Bishop Endgame


If White chooses a different plan, and transfers the king to guard the ‘a’ pawn and free up the bishop, we can get a position like this:


Success in chess depends on knowing typical ideas and recognizing those patterns on the board. Sometimes there is more than one way to win the chess game – in a tournament you only need to find one! In analysis, we can, however, muse around and come up with multiple solutions for our own entertainment…
DDT3000 – In-lightning, 15 minutes per game, ICC, 2011

It depends, and while this is a question of judgement but I would argue that 20. Rxf6!? is not really a sacrifice, but instead a fair trade off. I took on f6 without much thought, and went on to lose a complicated game by dropping a bishop in a probably drawn endgame. But given the opportunity – I would take on f6 again and have a fun game. On to the actual positional justification of the move:
I was not too happy with my position, since my bishop was passive, rook on b1 - awkwardly placed, and while the knight had some prospects on f5 and d5 - Black has ability to cover those squares. So I took an opportunity, which, given that both White and Black had about 10 minutes left on the clock (no increment) - I would take again. In a standard time controls game - I would likely not take such a decision very lightly, but in rapid chess - this move is almost standard.
After 20. Rxf6 gxf6 21. Ng3 
1) The knight gets a permanent control over f5
2) The bishop - permanent control over d5. Opposite coloured bishops definitely contribute to compensation.
3) Black's king is somewhat weakened.
Sure an exchange is worth something, sure White does not have any immediate threats; but the long term control over the light squares - is enough to create threats for your opponent, which given limited time - make things equally hard for White and Black. White has no bad pieces and a lot of positional trumps, so even if Black has a chance to try to convert an advantage, he would first have to defend for 20 moves. The game was not without mistakes, but here is a position which we arrived at after a few more moves


Even though I went wrong with 32. Nd6? – I still maintained a lot of chance until the very end. The risk White takes upon with Rxf6 in my view is equal to the risk that Black takes by allowing such sacrifices.
Jiganchine,Roman (2246) - Lipnowski Michael (1799) [E69] Canadian Junior (7), 05.01.2002, Winnipeg
We often read in chess books about "positional exchange sacrifices", and if a grandmaster gives up his rook on c3 for a knight in Sicilian, we make wise "knowing smiles" and don't think of this as anything special. However, as I must admit, in the following game my opponent's positional sacrifice came as a total shock for me. Even if there was a refutation, I could not think normally, and decided to escape with a draw offer. 1.d4 Nf6 2.c4 g6 3.Nc3 Bg7 4.Nf3 0-0 5.g3 d6 6.Bg2 Nbd7 7.0-0 e5 8.e4 Re8 [8...c6 is the most popular choice.] 9.Re1 c6 10.h3 Qc7 11.b3 [11.Be3 exd4 12.Nxd4 Nc5 13.Qc2 a5 14.Rad1 Bd7 15.b3 Rad8 16.f4 Bc8 17.Bf2 and white scores really well from here 17...Re7 18.Nde2 Nfd7 19.Qd2 Re6 20.e5 Bf8 21.Nd4 Ree8 22.exd6 Rxe1+ 23.Qxe1 Qb8] 11...a6 [11...exd4 12.Nxd4 Nc5 is another option] 12.Bb2 b5 13.cxb5 axb5 14.Qc2 Qb6 15.dxe5 dxe5 16.a4 b4 Diagram
A positionally dangerous move, as now White has a protected a4 pawn, c4 outpost and pressure along 'c' file. Michael, however, had a creative idea in mind... ? ! [16...bxa4 17.Nxa4+/=] 17.Nb1 Ra5 18.Nbd2 Rc5 19.Nc4 Ba6 20.Bf1 Qb8 21.Qd2? the strange rook on c5 played its role: I fail to find the right way: [21.Bc1! Bxc4 (21...Nb6 22.Be3 Rxc4 23.bxc4) 22.Bxc4 Ra5 23.Be3 would bring White a solid positional advantage.] 21...Bxc4 22.Bxc4 [22.bxc4 Ra5 is fine for Black] Diagram
22...Rxc4 Objectively, I believe the sacrifice was not fully correct: for the exchange Black gets a great square for his knight on c5, and a dangerous 'b' pawn. Everything depends on whether or not Black will manage to activate the rest of his pieces and prevents me from pushing the 'a' pawn. !? 23.bxc4 Nc5 24.Qc2 Nfd7 [Being a materialist by nature, I expected 24...b3 !? If White plays incorrectly, Black gains powerful initiative. For example: 25.Qd2 ?! (25.Qb1+/= ! is best; now because the weak e5 pawn Black has problems) 25...Nfxe4 26.Qa5 Nxf2 27.Qxc5 Nd3 28.Qa3 e4] 25.Nd2 [2010: 25.a5!? passed pawns must be pushed] Diagram
25...h5 !? Black's last several moves had a strong psychological effect on me: instead of trying to get material back, he plays moves that pursue purely positional long term goals: for example, weakening my king. 26.Nb3 ? rather pointless, because the exchange of knights favours Black. Better was [26.a5 and if 26...Na6 27.Nb3] 26...h4 27.Nxc5 [27.a5] 27...Nxc5 28.Bc1 ? [after 28.gxh4 ! ? 28...Qd8 Black wins the pawn back and gets his queen activated. Besides, I did not want to surrender an important 'f4' square. However, (28...Bh6 29.h5 ! ? 29...gxh5 ? ! 30.Qd1) 29.Qd1 Qxh4 30.Qg4 forces Black to retreat.] 28...hxg3 29.fxg3 Rd8 30.Kg2 1/2-1/2
Being upset about the course of the game (I have to defend!) and now not being able to find ways to consolidate (I missed them!), I offered a draw, which my opponent accepted. The position is already unclear. While the game got no logical conclusion, Black's creative idea was clearly successful! [Here is a possible variation:
30.Kg2 b3 31.Qe2 Rd4 32.Be3 Rxe4 33.Rab1 Bh6 34.Qf3 Bxe3 35.Rxe3 Rxc4 36.Rf1 Rc2+ 37.Kh1 f5 38.Qxc6 Kh7=/+;
30.Rf1 Rd3 31.Qf2 Qf8 and Black has counterplay: 32.Re1 Rc3~~; 30.a5 ? 30...Rd3 31.Be3 Rc3]