Here is a rapid game example I could have included into my IQP ebook/paperback:

An unexamined life is not worth living.
Here is a rapid game example I could have included into my IQP ebook/paperback:

Here are a couple of games that illustrate how White can opt into standard IQP structure against the French defence – this method was used effectively by Nadezhda Kosintseva to beat a couple of strong players:
Kosintseva, Nadezhda - Vysochin, Spartak
2004 , C07
1. e4 e6 2. d4 d5 3. Nd2 c5 4. c3 cxd4 5. cxd4 Nc6 6. Ngf3 dxe4 7. Nxe4 Bb4+ 8. Nc3 Nf6 9. Bd3 O-O 10. O-O Be7 11. a3 b6 12. Re1 Bb7 13. Bc2 Rc8 14. Qd3 Qd6
Kosintseva, Nadezhda - Xu Yuhua
2009 , C07
1. e4 e6 2. d4 d5 3. Nd2 c5 4. c3 Nc6 5. Ngf3 dxe4 6. Nxe4 cxd4 7. cxd4 Bb4+ 8. Nc3 Nf6 9. Bd3 h6 10. O-O O-O 11. a3 Be7 12. Bc2 Re8 13. Bf4 a6 14. Qd3 Bf8 15. Rad1 Ne7 16. Ne5 Bd7 17. Rfe1 Bc6 18. Qh3
18. ... Bd5 19. Re3 Qb6 20. b4 Rec8 21. Rg3Here are three games from Alapin Sicilian that illustrate the typical ideas in IQP positions – d4-d5 break and piece sacrifices around the Black king.
Pavasovic, Dusko - Podkriznik, Gregor
1999 , B22
1. e4 c5 2. c3 d5 3. exd5 Qxd5 4. d4 Nf6 5. Nf3 e6 6. Be3 cxd4 7. cxd4 Be7 8. Nc3 Qd6 9. Bd3 Nc6 10. a3 b6 11. O-O O-O 12. Qe2 Bb7 13. Rad1 Rac8 14. Rfe1 Rfd8 15. Bg5 Qb8 16. Bb1 Rd7
17. d5 Nxd5 18. Nxd5 exd5 19. Bf5 +/- 19. ... Rcd8 20. Bxd7 Rxd7 21. Bxe7 Nxe7 22. Ne5 Rc7 23. Qf3 f6 24. Ng4 Qd8 25. Rd4 Rd7 26. Ne3 Nc6 27. Rd2 Ne5 28. Qg3 d4 29. Nf5 d3 30. f4 Ng6 31. Qe3 Kf8 32. h4 Nh8 33. h5 g6 34. hxg6 hxg6 35. Qh3 Kg8 36. Nh6+ Kg7 37. Ng4 Nf7 38. Nf2 Ba6 39. Red1 Qc7 40. Nxd3 Bxd3 41. Rxd3 Rxd3 42. Qxd3 Qxf4 43. Qd4 Qc7 44. Rd3 Qc1+ 45. Kh2 Qc7+ 46. Kg1 Qc1+ 47. Rd1 Qc7 48. a4 Qc6 49. b3 Qc2 50. Rd3 Qc1+ 51. Kh2 Qc7+ 52. Kh1 Qc1+ 53. Rd1 Qc2 54. Qd3 Qc5 55. Qd5 Qc2 56. Rf1 Qc7 57. Qe6 Qd8 58. Rc1 Qh8+ 59. Kg1 Qd8 60. Kh1 Qh8+ 61. Qh3 Qd8 62. Qc8 Qd2 63. Qc3 Qd8 64. Qc7 Qd2 65. Rc3 Qd4 66. Rf3 Qh4+ 67. Kg1 Qe1+ 68. Kh2 Qh4+ 69. Rh3 Qd4 70. Qc3 Qf4+ 71. Kg1 Qd6 72. Rd3 Qe6 73. Re3 Qd6 74. Re8 Qd1+ 75. Kf2 Qd7 76. Rc8 Qf5+ 77. Kg1 Qd5 78. Rc7 a6 79. Qc4 Qd1+ 80. Kf2 Qd2+ 81. Kf3 Qd1+ 82. Kg3 Qe1+ 83. Kh2 Qe5+ 84. g3 Qh5+ 85. Kg2 g5 86. g4 Qg6 87. Qc2 Qh6 88. Qf5 Qh8 89. Qe6 Qa8+ 90. Kg3 Qf8 91. Qe7 Qg8 92. Rb7 1-0Pavasovic, Dusko - Horvath, Csaba
2000 , B22
1. e4 c5 2. Nf3 e6 3. c3 d5 4. exd5 Qxd5 5. d4 Nf6 6. Be3 cxd4 7. cxd4 Nc6 8. Nc3 Qd6 9. a3 Be7 10. Bd3 b6 11. O-O Bb7 12. Qe2 O-O 13. Rad1 Rad8 14. Bg5 Qb8 15. Bb1 Rfe8 16. Rfe1 g6 17. Ba2 Nh5
18. d5 exd5 19. Rxd5 Bf8 20. Ne4 Rxd5 21. Bxd5 Nd4 22. Bxf7+ Kxf7 23. Nxd4 Qe5 24. Nc3 Qxe2 25. Rxe2 Rxe2 26. Ndxe2 Nf6 27. Be3 Nd7 28. Bd4 Nb8 29. f3 Nc6 30. Kf2 Nxd4 31. Nxd4 Kf6 32. Ke3 Bh6+ 33. Kd3 Bc1 34. Kc2 Bf4 35. g3 Be3 36. Kd3 Bc1 37. Kc2 Be3 38. Kd3 Bg1 39. Ne4+ Ke7 40. Ne2 Bxh2 41. Ke3 h5 42. Kf2 h4 43. gxh4 Be5 44. N2c3 1/2-1/2Pavasovic, Dusko - Groetz, Harald
2002 , B22
1. e4 c5 2. c3 d5 3. exd5 Qxd5 4. d4 e6 5. Nf3 Nf6 6. Be3 cxd4 7. cxd4 Nc6 8. Nc3 Qd6 9. a3 Be7 10. Bd3 b6 11. O-O O-O 12. Qe2 Bb7 13. Rad1 Rfd8 14. Rfe1 h6 15. Bb1 Bf8 16. Bc1 g6 17. Ba2 Ne7 18. Ne5 Nf5 19. Bf4 Qe7
20. Nxf7 Kxf7 21. Bxe6+ Kg7 22. d5 Kh7 23. Qf3 23. ... Ng7 24. Bg8+ Nxg8 25. Rxe7 Bxe7 26. Be5 Rf8 27. Qd3 Bc5 28. Ne4 Rad8 29. Bxg7 Kxg7 30. Nxc5 bxc5 31. Qc3+ Nf6 32. Qxc5 Rxd5 33. Rxd5 Bxd5 34. Qxa7+ Rf7 35. Qc5 Bb7 36. b4 g5 37. a4 Rd7 38. h3 g4 39. Kh2 gxh3 40. Kxh3 Rd3+ 41. f3 Kg6 42. a5 Rd5 43. Qc4 Rd2 44. b5 Bd5 45. Qb4 Rc2 46. Qb1 Be6+ 47. g4 1-0I wrote a couple of books on this subject – one about pawn breaks in general, and one about positions with isolated queen pawns (where pawn breaks are common) specifically, and these topics still come up in games that I study.
Here are a few more examples with some instructive positions and ideas highlighted:
Zvjaginsev, Vadim - Popov, Valerij
Moscow-ch blitz 2004.09.05 , D42
1. e4 e6 2. d4 d5 3. Nd2 h6 4. Ngf3 Nf6 5. Bd3 c5 6. c3 Nc6 7. O-O cxd4 8. cxd4 Be7 9. Re1 dxe4 10. Nxe4 Bb4 11. Nc3 O-O 12. a3 Be7 13. Bc2 Re8 14. Qd3
14. ... Kf8 15. Bf4 b6 16. Rad1
Spassky, Boris V - Mnatsakanian, Eduard A
1959 , D15
1. d4 d5 2. c4 c6 3. Nf3 Nf6 4. Nc3 dxc4 5. e4 b5 6. e5 Nd5 7. Ng5 h6 8. Nge4 e6 9. a4 b4 10. Nb1 Ba6 11. Qg4 b3 12. Bd2 Nb4 13. Na3 h5 14. Qf4 Be7 15. Be2 Nd3+ 16. Bxd3 cxd3 17. Rc1 O-O 18. O-O f5 19. Nd6 Qd7 20. Rfe1 Rd8 21. Bb4 Bxd6 22. exd6 Qb7
23. d5 1-0
Pia Cramling - Nana Dzagnidze
FIDE Women's Grand Prix Tehran 2016.02.21 , D44
1. Nf3 Nf6 2. c4 e6 3. Nc3 d5 4. d4 dxc4 5. e3 a6 6. a4 c5 7. Bxc4 Nc6 8. O-O cxd4 9. exd4 Be7 10. Bg5 O-O 11. Qd2 Qa5 12. Rfd1 Rd8 13. Rac1 Bd7 14. Qe2 Be8 15. Bxf6 Bxf6
16. d5! +/- exd5 17. Nxd5 Rd6 18. b3 h6 19. h3 Rad8 20. Nxf6+ Rxf6 21. Rxd8 Qxd8 22. Rd1 Qc8 23. Ne5 Nxe5 24. Qxe5 Kf8 25. Re1 Qd8 26. Qe4 g6 27. Qxb7 Kg7 28. Qe7 Qxe7 29. Rxe7 Kf8 30. Ra7 Rd6 31. Rxa6 Rd1+ 32. Kh2 h5 33. Ra7 h4 34. a5 Rd2 35. f3 f5 36. Rc7 g5 37. a6 Bh5 38. Kg1 1-0Vladimir Kramnik - Anish Giri
Zurich Chess Challenge 2016.02.14 , A07
1. Nf3 d5 2. g3 g6 3. Bg2 Bg7 4. d4 c6 5. O-O Nf6 6. b3 O-O 7. Bb2 Bf5 8. c4 a5 9. Nc3 Ne4 10. cxd5 Nxc3 11. Bxc3 cxd5 12. Ne5 Nc6 13. Qd2 a4 14. Nxc6 bxc6 15. b4 Bc8 16. e4 Ba6 17. Rfe1 dxe4 18. Bxe4 Bb5 19. Rac1 e6 20. a3 Qd6 21. Bb2 Rfd8 22. Red1 Rac8 23. Rc5 Qb8 24. Rdc1 Qb7 25. Qg5 h6 26. Qf4 Qd7 27. Bf3 g5 28. Qe3 Rc7 29. Qc3 Rdc8 30. Be4 Qd6 31. Bb1 Kf8 32. Qc2 Ke7 33. Re1 Kf8
34. d5! e5 White to move (Black just weakened f7 square, so there should be a way to take advantage of that!)
 Black to move. His position is strategically very difficult. He ended up losing the game.
Mikhail Botvinnik was well known for his handling of positions with Isolated Queen’s Pawn. Here as well, he slowly built up the pressure and opponent faltered. Black had just played 17 …Ra8-c8?, exposing himself to an unexpected sacrifice. Botvinnik fully took advantage of his pieces being very active. Replay through the game here.
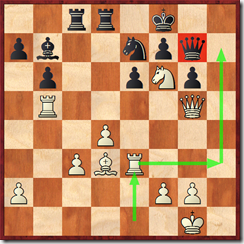
In a classic, but underestimated training game Botvinnik – Ragozin, the following position arose after White’s 28. Re1-e3.

The threat is to attack on the ‘h’ file, and in particular – to trap Black’s queen with Re3-h3-h7. In his notes, Botvinnik did not dwell too much on this position, but the capture on ‘c3’ is very thematic throughout this game, so I felt curious to check what happens if Black bravely ignores White’s idea, and carries on with his counter attack! Let me share some analysis.
Yes he can!! Yes he can take on c3. In fact, it would have led to a forced draw, and given that in the game Black went down after 28… Ng8 pretty fast, making a draw against the strongest player in the world was probably a great option (1947 was the only year in the twentieth century without a world chess champion). Play would continue:
29 . Rh3 Rxd4
Black carried out his plan of destroying the White center. Just two moves ago there were two White pawns on c3 and d4, now there are two Black rooks
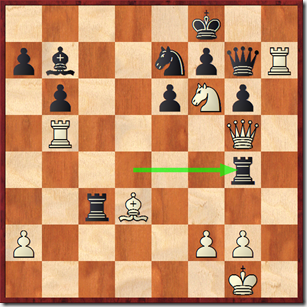
30. Rh7 Rg4!!
When your opponent attacks your queen, you should hang your rook as well!! This is what you get when you analyse a game with a computer, but in reality this is a very harmonious development of Black’s ideas – he destroyed White's center so that his pieces could get some freedom, and now they have it - big time. White’s queen is guarding the knight, which is guarding the White rook, so if either one of them gets distracted, White’s whole plot falls through. He does have enough resources to get a draw though.
31. Nd7+ Ke8
32. Qxg4 Rc1+ (Bad was 32... Qxh7?? 33. Nf6+)
33. Bf1 Qa1!
34. Qe2 Nd5!
35. Ne5 Nc3
36. Rh8+ Ke7
37. Nxg6+! fxg6
38. Rh7+ Kf8
39. Rh8+ Ke7
40. Rh7+ 
In the game Botvinnik won with a nice sacrifice, but I think this draw would have been a much more exciting finish to this game. This is probably one of the more interesting discoveries I ever made while analysing a grandmaster game from a book. Perhaps that’s because I had rarely analysed games from printed books with the help of a computer…
DDT3000 – pirulo, 2010, ICC, 3 minutes per game
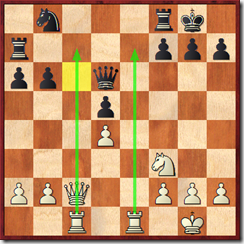
This is a typical IQP position, with one pair of minor pieces gone off the board, but White (myself) still having enough resources for the attack. Books have been written about this structure, Winning Pawn Structures by Baburin being my favourite one. Black has pressure on b2, and White does not want to play b2-b4 as that would weaken the c3 square. Running down to the last minute on the clock, I realized that my main idea is to exploit the pressure on the a2-g8 diagonal, and that this was as good moment as it would ever be. So …
23. Bxf6 Bxf6 24. Nxe6! A typical idea, all of White’s pieces have lined up for this sacrifice, so if it does not work now, it is not likely to work later either. I already once blogged about a similar sacrifice on e6, where the placement of the White pieces was quite alike.

24 ... fxe6 25. Rxe6 Qd8?!
Here I messed up my little ‘creation’, and according to my previous idea (from 5 seconds ago), I continued to build up the pressure on the a2-g8 diagonal with 26. Qf3? That allowed Black to escape and the game later ended in a draw. However, there was a much better and simpler idea, that would have left White up two pawns, with a winning position. What was it? Hint – White uses the fact that Qh3 may later attack Rc8.
PS. I find that these IQP structures are really hard to hold for Black without allowing White his moment glory with a d4-d5 breakthrough or piece sacrifice around the weakened kingside structure like in this example. It is quite rare to see a game (at least in my experience) where a favourable opportunity would never present itself and Black would just exploit the weakness of the d4 pawn.
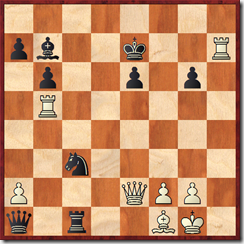
Some losses are just not fun to go back and look at! Some of them are just plain depressing, but there is always a good lesson to be learned from any game, especially if you look critically at your own play. In this case – my brain just was not there at the two very critical junctures of this last round game of the Canadian Junior Championship in 2002 in Winnipeg:
Moskvitch – Jiganchine, 2002
Instead of the correct 15… Qd5, I erred with 15 … f6? After 16. Qh5! I had to surrender material, but was fortunate to collect some of it back, so I was still in the game by the time we got to this position:

Answer: no! Correct was 35 …Rh8, or 35 ... fxg5. Watch the video for more details and to see what happened
In summary: after a bad mistake on my part, White conducts a nice attack in the Panov attack of the Caro-Kann. With a rook and 3 pawns for two pieces, my opponent was cruising to victory, but was a bit imprecise and allowed me to get outposts for my pieces. However I return the favour and make a huge blunder, so White wins.
Here is an older video I actually recorded a while ago (but only now had time to go to and do some minimal editing). I go through my blitz games and look at different ways Black can go wrong while trying to complete his development.
Moral of the story:
Memorize an opening variation – you may be lucky to win a single game.
Understand typical tactical ideas in a common pawn structure – you will win multiple games while your opponents play what they think “common sense moves”.
PS. Yes, unfortunately the audio is not very loud, my video editing skills are still non-existent.
 White to move
 White does not win on a spot, but the book shows that his position is better. This is the kind of guidance I would expect from an opening book, so I recommend it for its thoroughness! I took a longer way around, but in the end did create pressure against Black king and won (who said that analysing blitz games is a waste of time?!)
DDT3000-Chanchar, 2009, White to move
White won the exchange in a typical IQP/hanging pawns structure, but Black has broken through on the queenside by just capturing on c3.
I played 21. Nxf7 and later failed to win the game. But another typical sacrifice (which I did not have time to calculate) was much stronger.
21. Bxe6!! was winning. If black takes on e6, he loses the f6 knight and is under attack. If Black takes on h3, White takes on f7 with check, and then recaptures the queen, remaining up an exchange and a pawn. There was not all that much to calculate, but I missed this chance in my 3 0 ICC game.