(14) Moore Harry - Herder D
1994 BC Closed (6), 1994
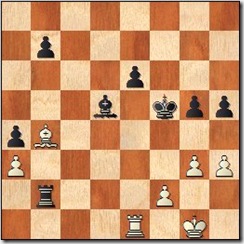
How are the opposite coloured bishop endgames affected when also one pair of rooks is on the board? A very important idea is that the stronger side can sacrifice the exchange in order to break through the blockade. This is very logical, as by giving up a rook for a bishop, we eliminate the drawish factor of the position - opposite colour bishops. 33...Bd5 White is suffering from weakness of light squares around his king, with potential back rank problems. This, in addition to Black's extra pawn is more than decisive. 34.exf6 Kxf6 35.a3 a4 36.h3 [36.Rc1 ! ? 36...Bc4 37.f3 -1.22 37...b5 38.Ba5 Rc6 39.Rd1 Be2] 36...Rc2 37.Bb4 h5 38.Ba5 Kf5 39.Bb4 Rb2 Diagram
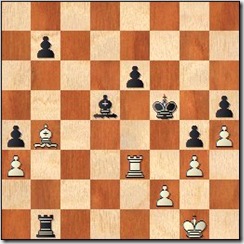
40.Re3? Of course, it was necessary to prevent Rxb4. Then Black would have to transfer his king to b3 or a2, with the idea of still sacrificing the exchange on a3. The complex of weak light squares on the kingside would make it very hard for the White king or rook to prevent this invasion. [40.Bd6 ! ? 40...g4 -1.22 (40...Be4 ? 41.g4+; 40...Kf6 ? 41.Be5+) ] 40...g4 41.h4 Rb1+ Diagram
! probably White missed this intermediate check. 42.Re1 Rxb4 ! 43.axb4 a3 Diagram
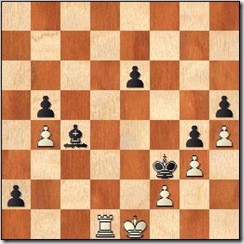
now the pawn gets to a2 44.Kf1 Bc4+ 45.Kg2 a2 46.Rc1 b6 47.Ra1 Bd5+ 48.Kf1 Ke4 49.Ke2 Bc4+ 50.Kd2 Kf3 51.Ke1 [51.Kc3 Bd5 52.Rf1 Ke2] 51...b5 52.Rd1 Diagram
White does not let the black king to 'b2'. Dave Herder opens the 'second front'. 52...e5 53.Ra1 e4! 54.Rc1 Bd3 Threatening Bb1 55.Ra1 Bb1 56.Kf1 e3 Diagram
Very elegant play by the BC master! 0-1


No comments:
Post a Comment