An unexamined life is not worth living.

Friday, May 29, 2009

Opposite Coloured Bishops – part 2

Part 1
(2) Theoretical position # 1

opposite_bishop_89

1.c5 ! Otherwise Black would come to d6 with the king, with a winning position 1...Bxc5 2.Bb3 ! 2...e5 3.Ke4 White can simply shuffle his bishop along the c8-h3 diagonal. This position illustrates how blockade can compensate for huge material disadvantage. Also, we can see that a pawn can be less important than certain positional factors, such as the colour of squares on which the enemy's pawns are located.

(3) Theoretical position # 2

opposite_bishop_90

1.Bh4+ ! Controlling 'f6'. White has to prevent Black from sacrificing the bishop for two pawns. [1.Bb4+ ? 1...Kf7 2.Kd4 Bb1 3.e6+ Kf6 4.e7 Kf7 0.00] 1...Kf7 2.Kd4 [2.e6+ ?? 2...Bxe6 0.00] 2...Kg7 3.e6 and White wins as after Ke5 the pawns keep advancing *

(4) Theoretical position # 3

opposite_bishop_91

1...Bd7! Here Black manages to make a draw. 2.Kf4 Bc8 The bishop just goes back and forth, while attacking 'f5' pawn, so that the White cannot get to d6 in order to support e5-e6. The 'f5' pawn being under pressure is an important defensive idea in these endings: if it advances, Black will immediately setup a blockade on the dark squares. Thus it has to be protected by the white king and White cannot make any progress. 1/2-1/2

Wednesday, May 27, 2009

Opposite Coloured Bishops – part 1

This begins the series of posts based on one of my articles that was published in En Passant, the Canadian chess magazine. I made little changes to the original contents, and just converted each example into a separate blog post.

When people talk about endgames they are often not sure what exactly is meant by this term. Sometimes any position without queens is called an endgame. A more sophisticated approach is to look at the role of kings. If the king can play an active role in the game without serious risk, usually this is called an endgame. And yet there are exceptions to this definition. To clarify the terminology, a famous coach M. Dvoretsky introduced the concept of 'simple positions', where one of the type of pieces is absent - either rooks, queens or minor pieces. Understanding simple positions is often more important than knowing precise theoretical positions. The most common type of simple positions is rook+minor piece vs. rook+minor piece. I would like to mainly deal with one type of such positions, where each side has a rook + bishop, with the bishops of opposite colours. We will also need to explore the endings with only bishops of opposite colours.

(1) Jiganchine R - Baryshev
Moscow team ch (4), 15.02.1998

opposite_bishop_85

28.Rb1 Here I naively expected either a draw offer, or a simplification of the position. In fact, Black has some advantage: his rooks have open files against my pawns; his bishop is more active than mine. 28...Rfc8 29.Be4 Rc5 30.Ra1 Ra5 31.a4 ? 31...bxa3 32.Rxa3 Rxa3 33.bxa3 Rb1+ 34.Kg2 Ra1 35.Rd3 Ra2 36.Rb3 a5 Diagram

opposite_bishop_86

I failed to find any plan, and allowed my opponent to invade with his rook. My pieces are so uncoordinated that I cannot save a pawn. 37.Rb8+ Kg7 38.Rb3 a4 39.Rf3 Bf4 40.h4 f6 41.hxg5 hxg5 42.Rf1 Rxa3 43.Bd3 Rc3 44.Ra1 a3 45.Kf3 Kf7 46.Ke2 Ke7 47.Kf3 Kd8 48.Ke2 Kc7 49.Kd1 Kb6 50.Rb1+ Ka5 51.Rb8 Rc5 52.Ra8+ Kb4 53.Rb8+ Ka4 54.c4 [54.Ra8+ Trading off rooks cannot save White: the 'a' pawn would cost me a bishop. 54...Ra5 55.Rxa5+ Kxa5 56.Bc4 Kb4 57.Ba2 Kc3-+] 54...dxc3 55.Bc2+ Ka5 56.Ra8+ Kb6 57.Rxa3 Rxd5+ 58.Ke1 Bd2+ 59.Kf1 Diagram

opposite_bishop_87

59...Rb5 ?? Just as I was considering timely resignation, here comes the amnesty. [59...Re5 after 60.Ra8 Re1+ 61.Kf2 Rc1 62.Bb3 Bf4 63.Rf8 Be5 White's counterplay against f6 is eliminated, and Black can start invading with his king.] 60.Rb3 ! Of course! After the exchange of rooks I can block the Black pawns. 60...Rxb3 61.Bxb3 Kc5 62.Ke2 Kd4 63.Bc2 d5 64.Bd3 Ke5 Diagram

opposite_bishop_88

65.Kf3 Ke5-f4 was threatened; Black's only hope is to win my g4 pawn, but this is impossible. 65...Bf4 66.Bb1 Kd4 67.Ke2 White established a fortress. 67...Kc4 68.Bc2 Kb4 69.Kd3 Be5 1/2-1/2 Black tried to win for another 30 moves, as I was low on time, but finally my claim for a draw was accepted.

A very instructive game. I remember being surprised twice: 1) when my opponent did not offer me a draw and then outplayed me. 2) when he allowed me to trade off rooks and then still thought he had a win.

Everybody has heard that endgames with bishops of opposite colours are drawish, because it is very often possible to set up a blockade on the squares of colour of one's own bishop. Then even a 2 or 3 pawn advantage can be insufficient for a win, just as in my game against Baryshev. Positional subtleties are usually more important than material. A defending side can sacrifice a pawn to set up a blockade or a fortress; a stronger side can sacrifice material to create a passed pawn or to get access to the opponent's weakness. Future posts will show some theoretical positions…

Saturday, May 23, 2009

Endgame with opposite colour bishops

Change He Li – Howard Wu, Keres Memorial 2009

image Black to move. Can he win this endgame?

I enjoy poking at random endgame positions and try to understand if they are winning or not. While looking at this endgame for a few seconds during my own game - I wondered if Black can win this position. It seemed that because he can get two connected passed pawns on the kingside - his chances should be very high. The correct plan should have started with a move like f6, followed by g5:

image
In analysis, I can’t see how White can prevent a position like this, so this confirms my quick evaluation:

image (Analysis position) After 50… g3+ , the pawn structure favours Black

The key is, of course, to advance pawns on dark squares, to prevent a typical blockade. Notice how White’s disconnected pawns on the queenside are blocked and useless. The game, however, went quite differently: Black played f7-f5, so White was able to advance h4-h5, and effectively separate Black’s pawns (a draw was soon agreed):

image (Game continuation) After 42. h5 – this pawn structure allows White to make a draw.

If you can see a way for White to make a draw in the initial position with best play from both sides - please leave your comments! Here is some more extensive analysis in the viewer:

Double piece sacrifice – exploiting the diagonal

Jiganchine – Chang He Li, 2008

image  White to move

Playing in this year’s Keres against the young talent Change He Li - surely reminded me of a combination that I had overlooked against him about a year before that. I played 13. Bf2, and won that game in a long endgame. Shortly after playing this move - I noticed the winning Nxe6 shot:

13. Nxe6!! fxe6 14. Nxd5
image
14… exd5 15. Bxd5+ Kh8 16. Bxa8 +-

White has a rook and 3 pawns for a piece, and his pawns in the center are very active. This was one of the cases where during the game to avoid distraction - you don’t want to look back and wonder what would have happened if you had played a better move.

Wednesday, May 20, 2009

Paul Keres Memorial 2009 - overview

Jack Yoos had a great tournament this year, only a month after moving to Vancouver from Montreal. Welcome back, Jack!

Just like I gave an overview of my BC Closed games last October, here are some little notes with quick impressions of my play.

Round 1: LeBlanc – Jiganchine (0-1)

image Black to move.

White is a bit better: 16… Rxd6 is not good due to 17. c5 and the knight on d6 is strong.. Since my bishop is also attacked, I decided to move it with a gain of tempo, playing 16… Bg4. White responded with a big blunder – 17.f3??. After Qxd4+, black picks up up two pawns, so the game ended pretty quickly: 17… Qxd4+ 18. Kh1 Bxf3 19. Rad1 Qxd1 20. Qxd1 Bxd1 21. Rxd1 Ne8 0-1

This surely reminded me of my game against Paul from last year’s Keres where after my blunder he had a winning position, but blundered back and lost.

Round 2: Jiganchine – Orlov (1-0)

If you live in BC, Canada then - basically Georgi Orlov is the strongest player you get to regularly see. And after playing in Keres Memorial 6 times – I never actually got to play him – until the 7th tournament. Jack Yoos and Sergei Sokourinski used to have an argument about whether Orlov and Spraggett were of similar strength, and while Jack was convinced (based on his own score against each) that Spraggett is stronger, the very fact of comparison being made speaks volumes.

Black risked a bit more than he should have in the opening, and the ‘star’ move definitely came here, after Black played … c5.

image White to move

19. Bc6!

No, this is not me drawing the arrow on the diagram incorrectly - the bishop actually did stop one square short from taking the rook. The rook is not running away (taking it would give Black compensation), instead White totally dominates central squares and increases pressure against c5 pawn with Qd5 coming. After the game Georgi admitted having missed this move. He then had to give a rook for a dark squared bishop, and my light squared bishop live to tell the tale, the game ended after some complications in this position:

image White to move

38. Rbf7! and Black resigned since Bf3 mate can’t be prevented without giving up the queen.

After this game – the tournament kind of ended for me – I took a bye, and then still could not play normally since the feeling of having done something special overwhelmed me. This was the first time I played an International Master in my entire life, so to score a win from the first attempt felt quite extraordinary. I realized that Georgi was rusty, and that he comes to Keres Memorial to play risky chess against local amateurs like myself which does mean he loses a game like this once every couple of years, but I still could to get back to my senses (I did try quite hard).

Round 3:  bye (1/2) I was quite exhausted after the previous game, and having been tired before the tournament (this programmer’s been very busy at work recently) – I had planned to take a bye anyway, so this seemed like a good moment for that.

Round 4: Jiganchine – Gentes (1/2-1/2)

image 24… Qb6

After some manoeuvring by both sides, in this position Kevin offered me a draw, which I accepted. During previous few moves I was mostly focused on keeping positional balance.

Round 5: Pechisker – Jiganchine (1/2 – 1/2)

This was the game that really threw me off balance and probably had to do with my dismal play the next day. Alfred has a style that I find hard to adjust to, so every game against him is usually hard for me. Just like in our last game in the BC Closed, I got a great position out of the opening (Slav defence), but failed to convert.

image Black to move

23… Bd5! White has to give up a pawn with 24. e4 just to rescue his tied up pieces.

However a few moves later, the game was somewhere between winning for Black, and a draw and I made a humongous error:
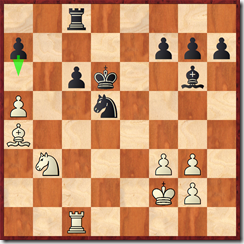
image 35… a6? allowed 36. Nc5, and suddenly my pawns are weak, pieces are passive, and I am low on time.

That kind of move is hard to explain, but I think, I had planned c6-c5, and was concerned about a5-a6, and Nb3-a5-b7 with counter play. Fortunately this time my desperate measures worked, and in the complications Alfred offered a draw, which I accepted. I was terrified however that I allowed such massive counter play in a technical position.

Round 6: Jiganchine - ChangeHe Li (1/2 – 1/2)
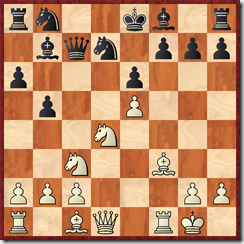
image White to move

Another Sicilian Scheveningen, just like in round 4, and again my understanding of position was lacking.
In my quick preparation the morning before the game I had anticipated something similar (an early e4-e5 break), but did not look deep enough.
Here apparently 12.Bxb7 Qxb7 13.Qh5! scores around 90%. I instead played 12. Bf4 and after 12…Nc6 took the knight and offered a draw. I was uncomfortable playing a young improving player, but also getting increasingly worried that I misplayed something (which was kind of true). I also wanted to get some rest before the final round (but had I known that after a draw I would get to play Jack, I would have re-considered).

Round 7: Yoos – Jiganchine (1–0)

I had not lost to Jack Yoos since 1999, but I still remembered the feeling of getting blown off the board before the opening was over. I really wanted to avoid that, so instead of my main opening as Black – I played the line in the Caro-Kann, which I believed to be passive but solid.
Jack played very energetically and still had a very dangerous initiative:

image Black to move

Being tired from defending for the last couple of hours - I missed the most obvious threat created by 19.Nc2 – which is Bxc4, and knight has to keep guarding d7, so White gets his pawn back with great position. Trying to get Nh6 into the game - I played 19…f7-f6? (instead Rd8 was better) and after 20.exf6 gxf6 21.Bxc4! and Rhe1 – I made a few more blunders and lost fairly soon (but things were really going downhill at that point). I was very impressed by the way Jack treated this opening variation (and wished I had put up a better resistance).

Monday, May 11, 2009

Keres Memorial 2009

I am planning to play in the Paul Keres Memorial 2009 Open chess tournament this coming weekend. It is a nice annual tournament ran by BC chess enthusiasts to commemorate the fact that Paul Keres’ last tournament win was held in Vancouver in 1975. Even though my last year’s preparation for the tournament was far from perfect, this year it was even worse as in the last couple of months I barely looked at chess. I hope to write a mini-report similar to the one I did last year, but for now I decided to please myself with the collection of little combinations from my own games that I played over the years in the Keres Memorial tournament. In a couple of the diagrams I don't give the solution so you can try to figure out the answer (not very difficult).

Fullbrook – Jiganchine, 2000

image Black to move – full details here - http://roman-chess.blogspot.com/2007/09/game-against-nigel-fullbrook.html

Jiganchine – Huber, 2001
  image White to move. 26. Ng4 (with a double attack on h6 and e6) was enough for White to break through.

Jiganchine – Maheux, 2002

image White to move. White gives forced checkmate, I let you figure out this one yourself.

Jiganchine – Erichsen, 2007

image  White to move. 28. Nxh6 gave White a winning advantage, which I later managed to spoil and the game was drawn.

Jiganchine – Poitras, 2008

image White to move. 28. g4 traps the queen – Black has to sacrifice a piece to rescue the royal lady.

Sunday, May 3, 2009

Zugzwang in a rook endgame

image 
White to move
Plaskett – Fuster, 1979

White just played 40. Kg4 and Black resigned. He has to move the king away from b7, and then e8Q wins. If the rook moves, then White starts with a8Q, followed be e8Q.

I found this example a bit entertaining since zugzwang in a rook endgame is quite rare, since a rook is a very mobile piece. It also shows that putting a rook behind passed pawns is often the best strategy.

Hit Counter