The major rule of rook endgames is that you should keep your rook active. When you look at a given position - usually it is obvious whether or not your rook is active However, sensing the moment and finding the tactical opportunity for activating the rook actually requires a bit of experience and judgement. An important corollary of the above rule is that you should also try to keep your opponent’s rook passive.
What does it mean for a rook to be active?
1) it attacks opponents’s pawns and protects its own
2) it can attack or cut off opponent’s king
3) it has freedom for manoeuvre, so zugzwang is never a problem
3) if there are vital open files or ranks - it controls one of them
To be a bit more specific - here is an example from a report I wrote for a Canadian Chess magazine a few years ago:
Juma - Kazakevich, Canadian Junior Championship, 2004
 Black to move.
GAME CONTINUATION: In the game Black played 32….Kg7? Centralizing the king cannot be wrong, it can only be untimely. White responded with 32. a4! and the game was agreed drawn a few moves later in this position:
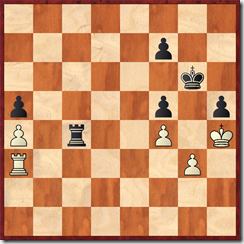 Black can’t make any progress. His rook is slightly more active, but there is no zugzwang in sight. The extra doubled 'f' pawn has lost most of its value, and bringing the Black king to the queenside would cost the kingside pawns.
CORRECT CONTINUATION: Much better was 32... Rc3! 33. f4 Ra3
 The Black rook attacks both the a2 pawn and the g3 pawn. In the game it could only attack one of them at the same time. Such placement of a rook, which makes sure the 'a2' pawn does not move, is standard for rook endings (check out Rubinstein-Lasker, 1909, if you have not seen it). My analysis gave Black a win in all lines, but over the board it is enough to find the continuation that gives best winning chances, and that would be this line. Eventually we could come down to the position like this:
 White to move. He is in zugzwang, since his rook has no moves, so he is likely going to lose as Black king threatens to invade on g4.
Why bring up this old dusty game on which I already wrote something long time ago anyway? Well, it only today occurred to me that history repeated itself in my own game, and I also failed to keep my rook active in a pretty similar situation. This game was played even earlier, but I did not analyse it seriously until last year.
Nathani – Jiganchine, BC Junior Championship, 2001
 Black to move.
GAME CONTINUATION: I decided to play “safe”, keep as many pawns on the board as possible, and gave up the advantage by misplacing my rook:
27… Rb7? 28. Ra6 Rc7.
 Black’s rook is passive, an extra pawn does not mean much here, the game should be drawn.
CORRECT CONTINUATION: Instead I had a much better option that would have kept my rook active:
27... Rb5! 28.Rxa7 Rxe5 29. Kg3 Rc5 30. Ra2 Ke7
 Black is up a pawn, and has a more active rook. Stronger players can correct me, but this is a lot likely to be winning than the position that I got in the game.




 Posts
Posts

